MySQL


MySQL |
|
| Solution Installation > TSS Installation > Install TSS on a standard server > Upgrade TSS/Console > With Replication (Hot Backup) |
OverviewThis section describes how to upgrade the TSS/Console version when using MySQL replication. This upgrade will interrupt device connections during the upgrade procedure.
Initial situation
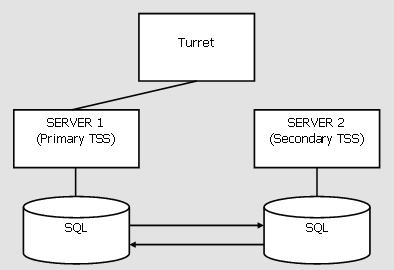
•All turrets are connected to primary TSS •Boot Settings (Turrets & TPOs) define proper Primary and Secondary server •MySQL replication is running properly •Primary TSS is running properly •Secondary TSS is running properly •Primary/Secondary FTP is not used (new HTTPS “conf” is used)
On Primary ServerBlock HTTP Traffic
Add an Inbound Firewall rule that blocks HTTP/S (80, 443) traffic on the TSS. This will force all devices to failover to the Secondary TSS
Right Click on the Start Button, choose “Run” and then type “wf.msc” and hit OK
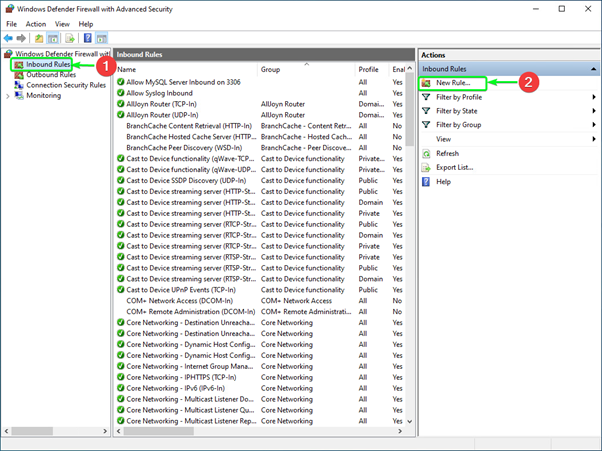
Select “Inbound Rules” and then Select “New Rule” as per below
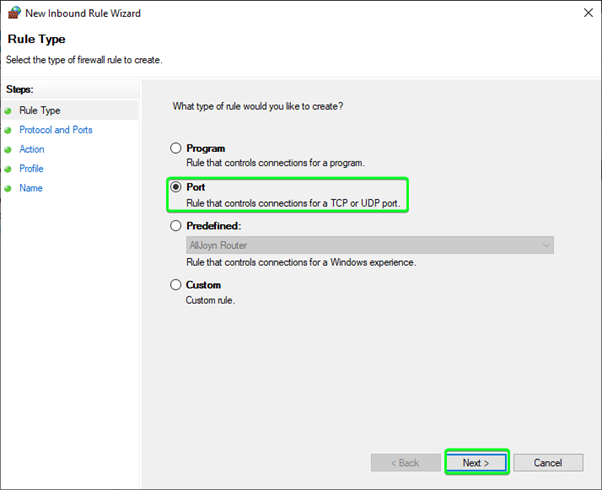
For “Rule Type” select “Port” and click Next
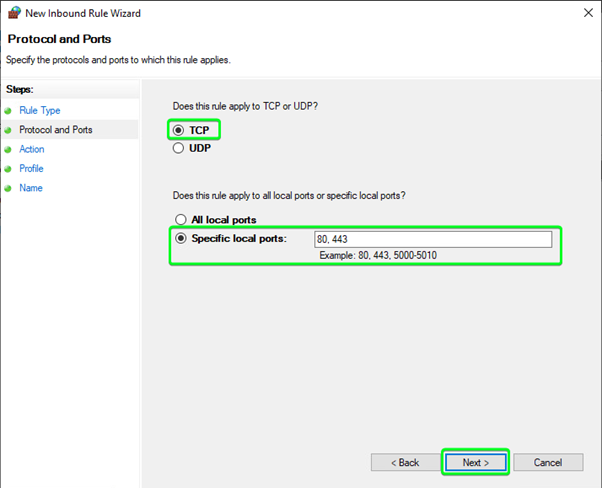
For “Protocol and Ports” select “TCP” and “Specify local ports” and input “80, 443” as seen below which will block HTTP and HTTPS traffic inbound on the TSS, then click Next
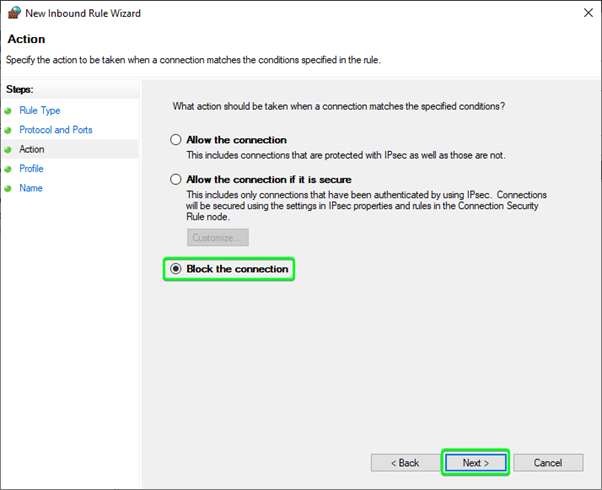
For “Action” select “Block the connection” and click Next
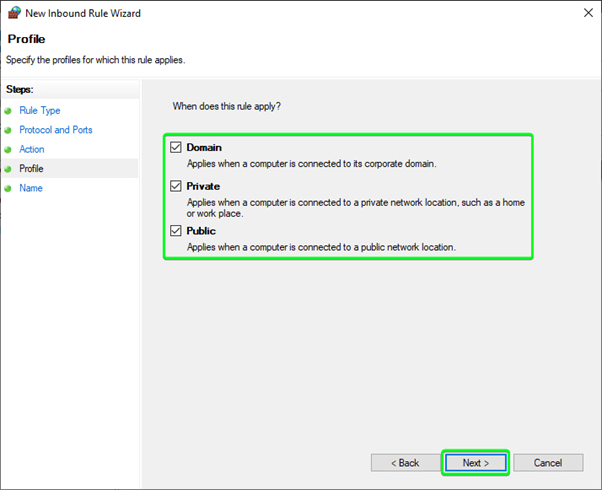
For “Profile” make sure that all (Domain, Private, Public) are checked and then click Next
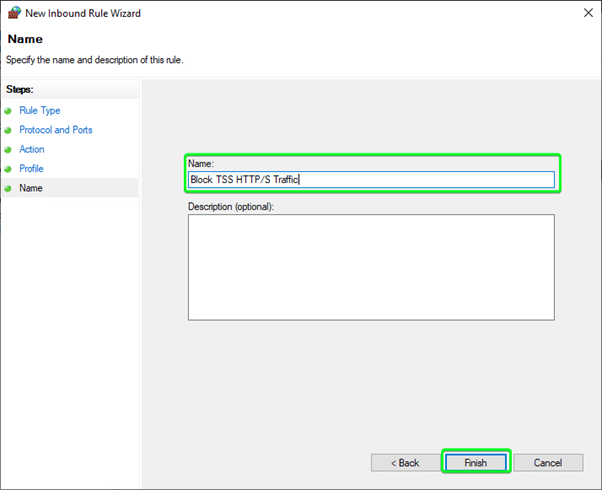
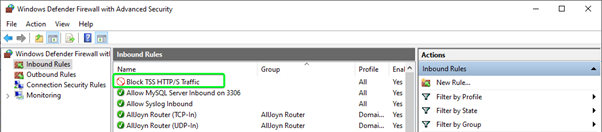
For “Name” input a name for this rule and click “Finish”
If remote TSS access is required from a specific Client PC for testing (where no local browser access is available on the server) you will need to add more specific firewall rules to block ALL HTTP/S traffic except from the single remote client PC. This process is not straightforward and can vary from server to server. It is left for the reader to investigate and apply a suitable firewall configuration to achieve this if required.
A rough guide (which works) of the process to only allow access from a specific client IP while maintaining a block from all other clients is: Make a note of any changes made, since they will need to be reverted back further in the guide when you need to restore access (remove the firewall block)
In Windows firewall > Inbound Rules, you need to “disable” ALL rules that apply to ports 80 or 443 These could be system added rules applied by IIS. An example of rule names could be: “World Wide Web Services (HTTP Traffic-In)” and “World Wide Web Services (HTTPS Traffic-In)” Note that once you “disable” all inbound rules that apply to ports 80 or 443, that ALL HTTP/S access will be blocked since Windows Firewall explicitly blocks anything that does not have a specific match. Now you can add a more specific rule that ONLY allows inbound access on a specific IP address. Its easier to give an example with a single PowerShell command to achieve this. Open a PowerShell terminal prompt and run the following command: Change the -RemoteAddress 1.1.1.1 below to match your Client allowed IP
New-NetFirewallRule -DisplayName "Only Allow HTTP/HTTPS for one client" -Direction Inbound -Action Allow -Protocol TCP -LocalPort 80,443 -RemoteAddress 1.1.1.1 -Profile Any
In the Windows Firewall GUI window, refresh the Inbound Rules to see the new rule is listed. Test server access from the allowed client and test and make sure that ALL OTHER access is blocked.
Tip to check where devices are registered
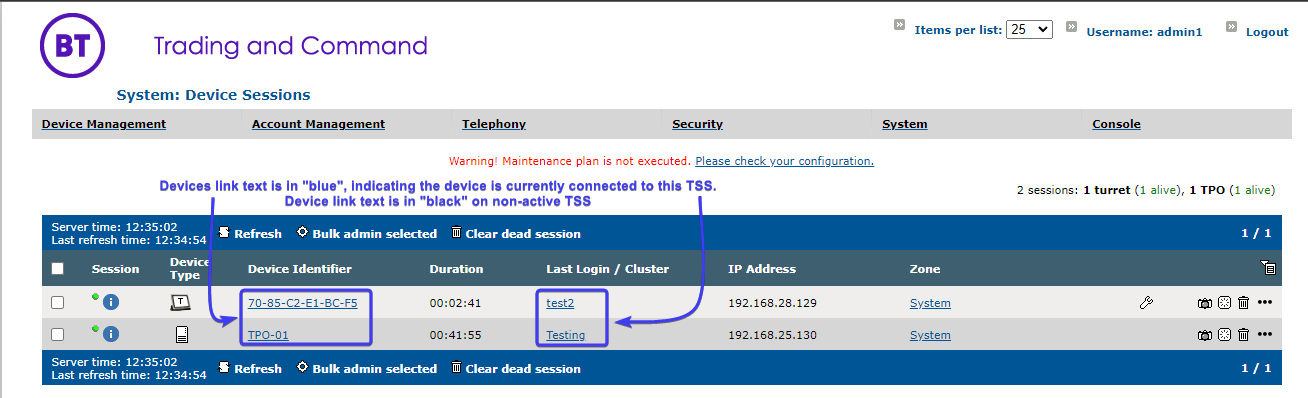
To check which TSS Server the devices are registered on currently, there is a subtle difference in the “System > Sessions > Devices Sessions” If you look very carefully you will see that the devices as shown below are in “blue” text if they are connected actively on this TSS, if the text is in black it means it is not actively connected on this TSS.
Update Application Pool
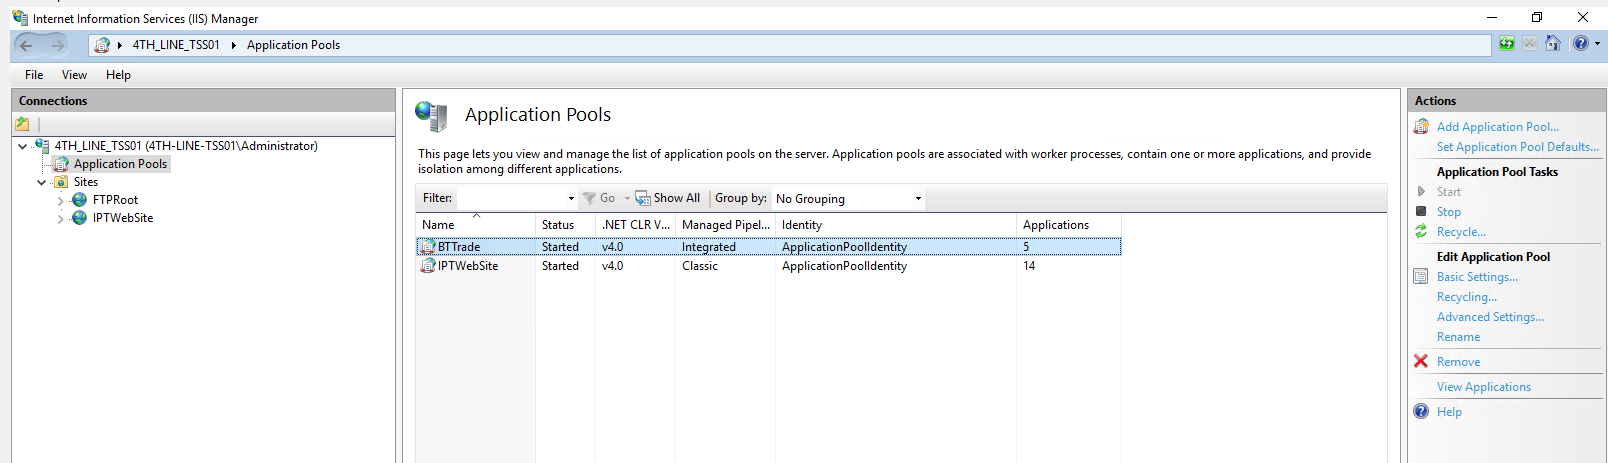
If the TSS has older versions, retain the existing application pool and create a new application pool named "BTTrade" with the Integrated Managed Pipeline for the latest version. This ensures compatibility with the latest releases, as illustrated below.
See Application Pool Configuration for full instructions. Make sure to also configure the correct Folder Permissions
Upgrade Primary TSS/ConsoleThis step must be executed on Primary server.
Proceed as follows: Extract the archive "TSS-Console-10.1.Y.Z.cab" Launch the application "UIM.exe" with administrative privileges.
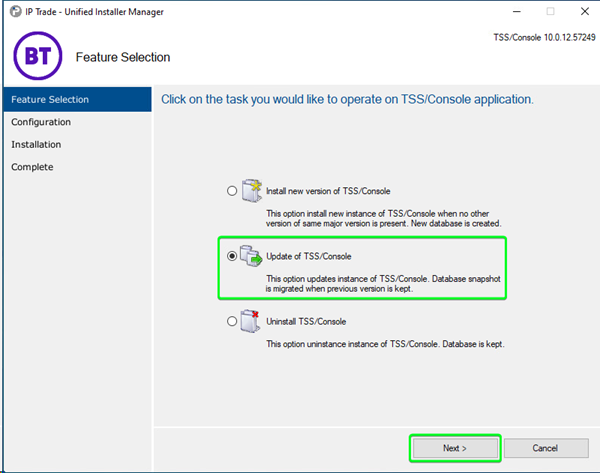
Select option "Update of TSS/Console" and press "Next" button.
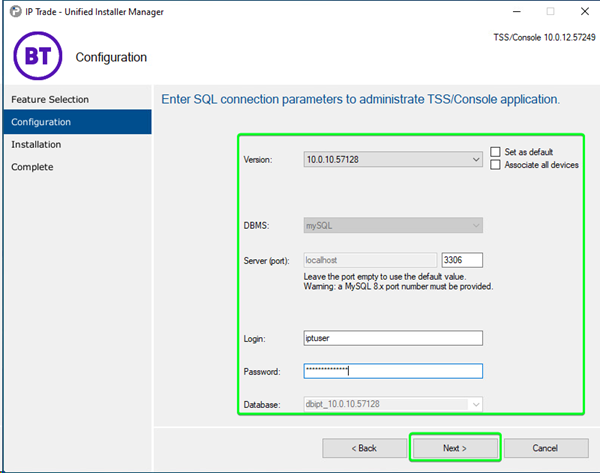
Configuration Options: oVersion: Version to upgrade. oServer: Server where database is stored. Server will be determined depending of selected version. oLogin: Login to connect to DBMS. oPassword: Password to connect to DBMS. oDatabase: Database will be determined depending on selected version..
Press "Next" button.
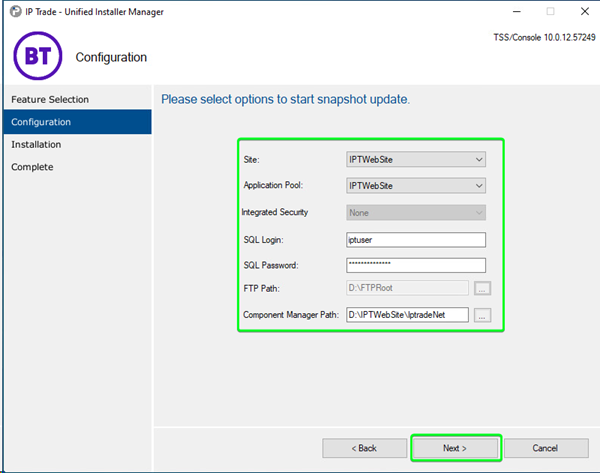
Configuration Options: oSite: HTTP site that will be used. oApplication Pool: Application pool used for this install (BTTrade for latest versions). oSQL Login: Login TSS application will use to connect to mySQL. oSQL Password: Password TSS application will use to connect to mySQL. oFTP Path: Path to the virtual "conf" directory "D:\FTPRoot" oComponent Manager Path: "D:\IPTWebSite\IptradeNet"
Press "Next" button.
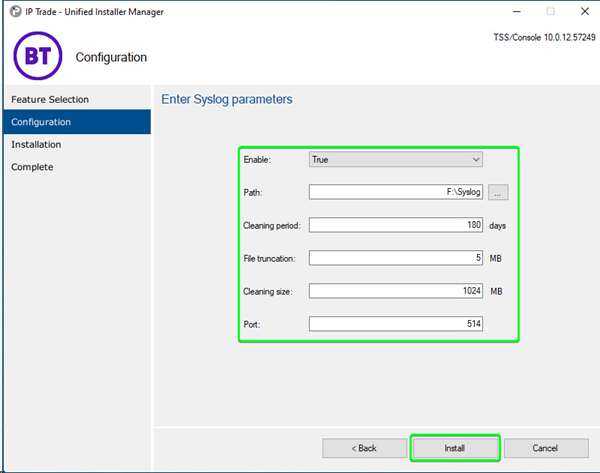
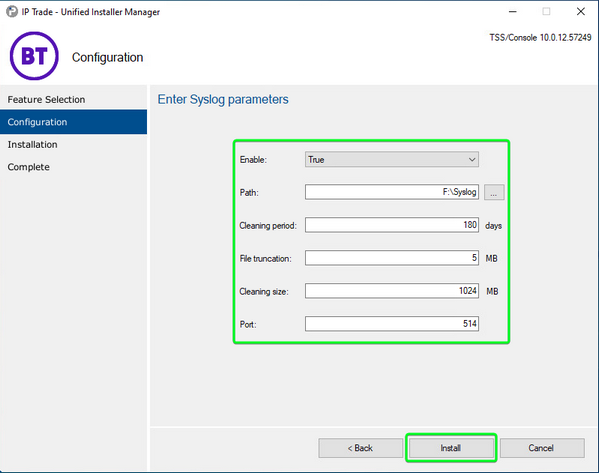
Configuration options for Syslog: oEnable: If set to"True" enables Syslog log (This sets automatic start on the installed Windows Service) oPath: "F:\Syslog" oCleaning period: Delete Syslog files that are older than this value (in days) oFile truncation: Maximum file size (in MB) of each Syslog log oCleaning size: Maximum total file size (in MB) of all Syslog log files oPort: Port of Syslog service
Press "Install" button.
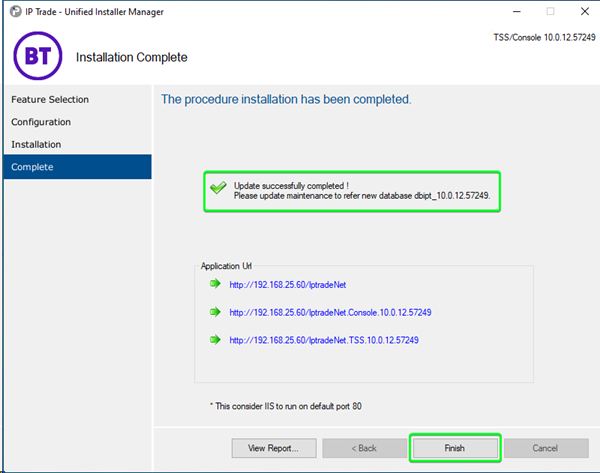
When the install is complete, click on “Finish”
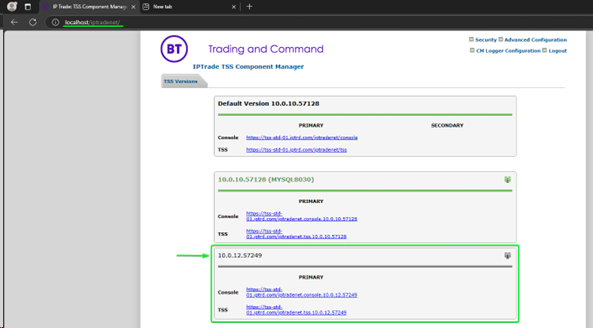
After the installation is complete you should now have a new TSS version available (the original version that was used is still there and is still replicated at this point)
NOTE: Here we are using the local web browser on Primary server to connect on “localhost/iptradenet” to check the TSS since we still have the Firewall rule in place that blocks external input requests to HTTP/S
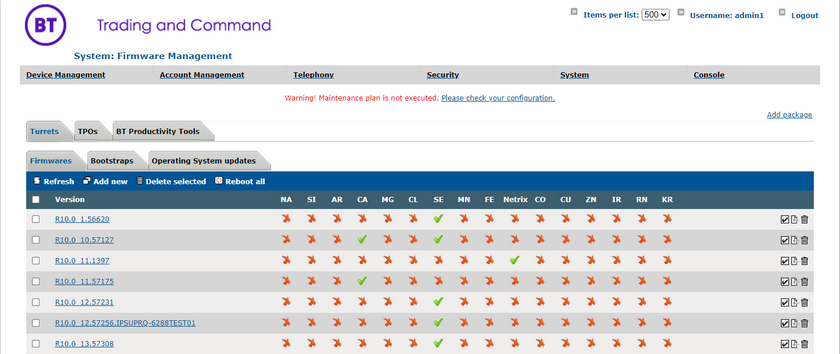
Upload new firmwareOn Primary server, open Console application. Go to System > Firmware management Add all the required new firmware versions.
UnBlock HTTP Traffic on Primary Server
Remove the Inbound Firewall rule that blocks HTTP/S (80, 443) traffic on the TSS which we added at the start.
From an external PC web browser, connect on the Primary TSS and connect to the new upgraded TSS Console version and check that everything is OK
Remove old replication settings from new DB
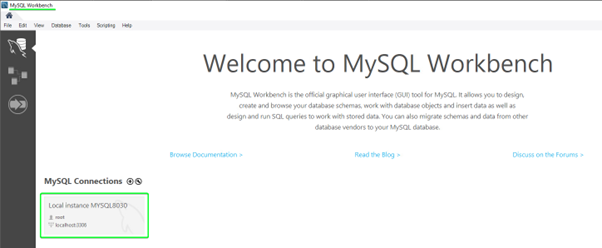
We now need to remove the old replication settings from the upgraded Primary TSS DB before deploying the UIM installer on the Secondary TSS. The UIM installer will fail on the Secondary TSS if this step is not done, since it still has the old redundancy information in the DB after the upgrade. Open “MySQL Workbench” on the Primary TSS server and login with root (or privileged login credentials)
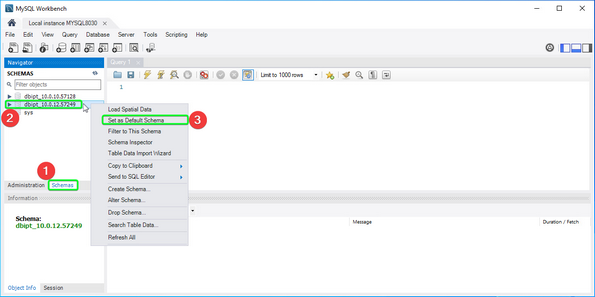
Once logged in, select the “Schemas” tab in the Navigator, then select the NEW upgraded DB version, then “Right Click” on it and select “Set as Default Schema” (This is highlight it in bold text)
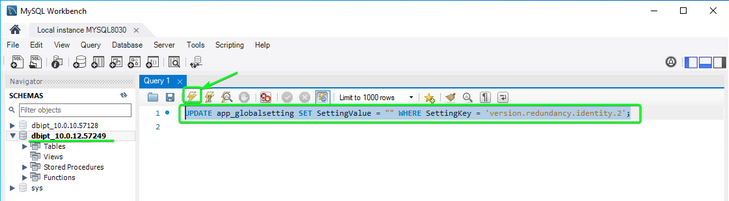
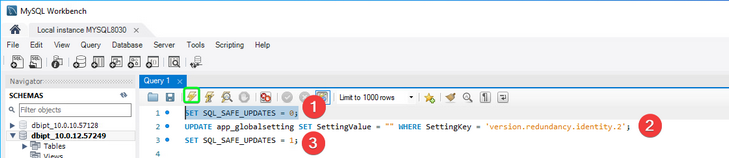
In the Query box, enter the below query, then highlight the entire text of the query and run it by clicking on the “Lightning Icon (Execute)”
UPDATE app_globalsetting SET SettingValue = '' WHERE SettingKey = 'version.redundancy.identity.2';
If you get an Error Code: 1175 when you try to execute the above query, don’t worry this just means that safe updates is currently set and enforced on the Workbench application.
You can bypass this temporarily by running these additional queries one by one.
SET SQL_SAFE_UPDATES = 0; UPDATE app_globalsetting SET SettingValue = '' WHERE SettingKey = 'version.redundancy.identity.2'; SET SQL_SAFE_UPDATES = 1;
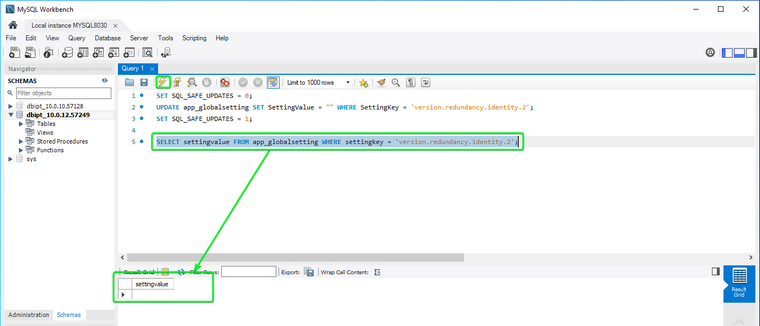
Once complete you can confirm that the required change was successfully done by running this query (with the same method as above). The output should show nothing set for “settingvalue” as seen below.
SELECT settingvalue FROM app_globalsetting WHERE settingkey = 'version.redundancy.identity.2';
Backup new DB on Primary ServerTake a backup of the new upgraded DB on the Primary TSS server.
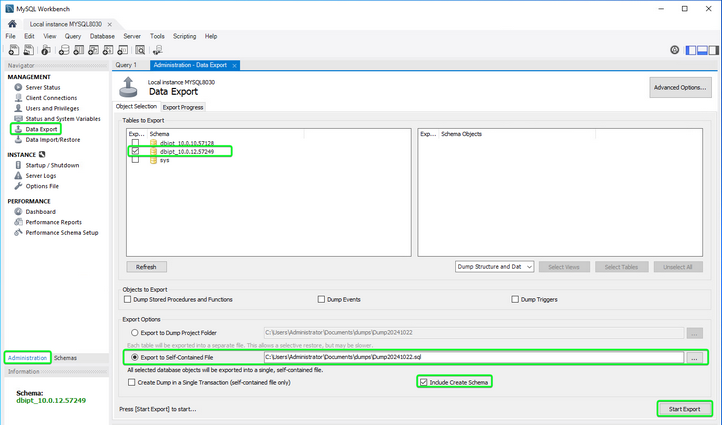
In MySQL Workbench, select the “Administration” tab in the Navigator menu, then select “Data Export”, then select the check box next to the new upgraded DB version, then select “Export to Self Contained File” and select a “path and file name”, then make sure that “Include Create Schema” is Checked as this will allow to import the DB on the Secondary Server without having to supply the DB name, and then lastly click on “Start Export”
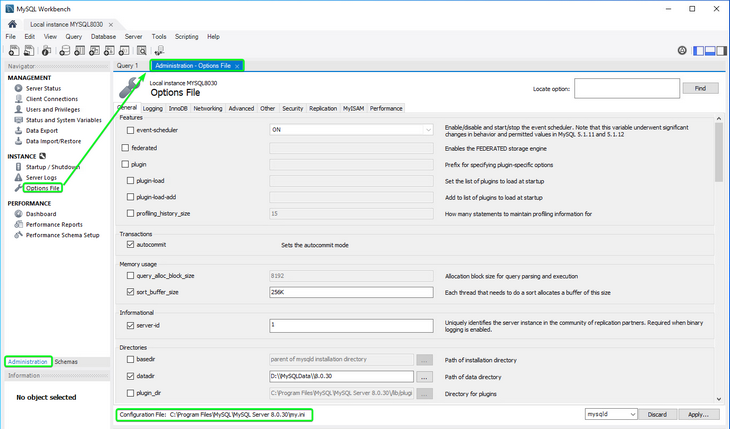
Once the export of the DB backup is complete, copy the DB backup file onto the Secondary TSS Server. We will use this DB backup to restore the DB into the Secondary Server MySQL later. Configure MySQL Option file on Primary ServerIn MySQL Workbench in the Navigator window, select the “Administration” tab and then under “INSTANCE” click on “Options File”
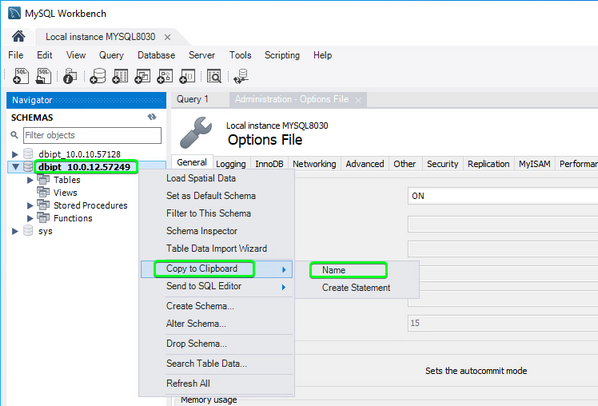
Once you have opened the “Option File”, select the “Schemas” tab and then Right Click on the NEW DB name and select “Copy to Clipboard > Name”
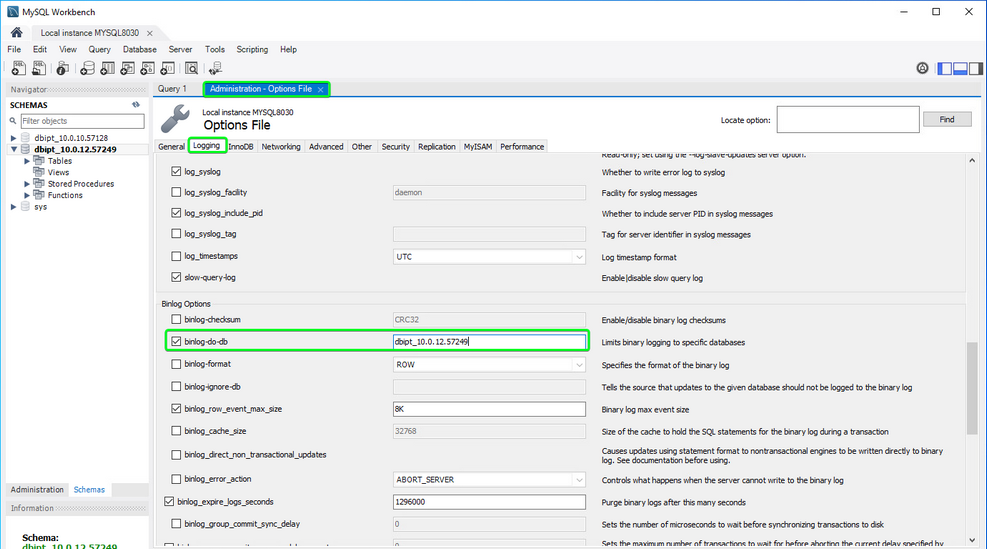
Now back in the “Administration – Options File” tab select the “Logging” tab and find “binlog-do-db” and paste the value from the clipboard (which we just copied above), make sure to REMOVE the preceding and trailing quotes ` from the text pasted value so that only the DB name itself is left, like below
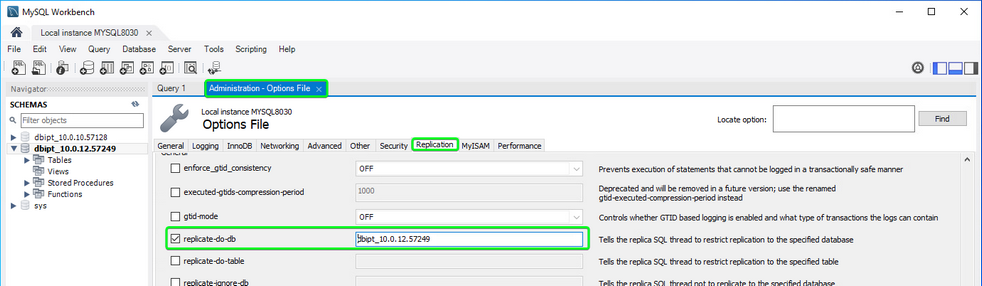
Now move to the “Replication” tab and find “replicate-do-db” and paste the value from the clipboard (which we just copied above), make sure to REMOVE the preceding and trailing quotes ` from the text pasted value so that only the DB name itself is left, like below
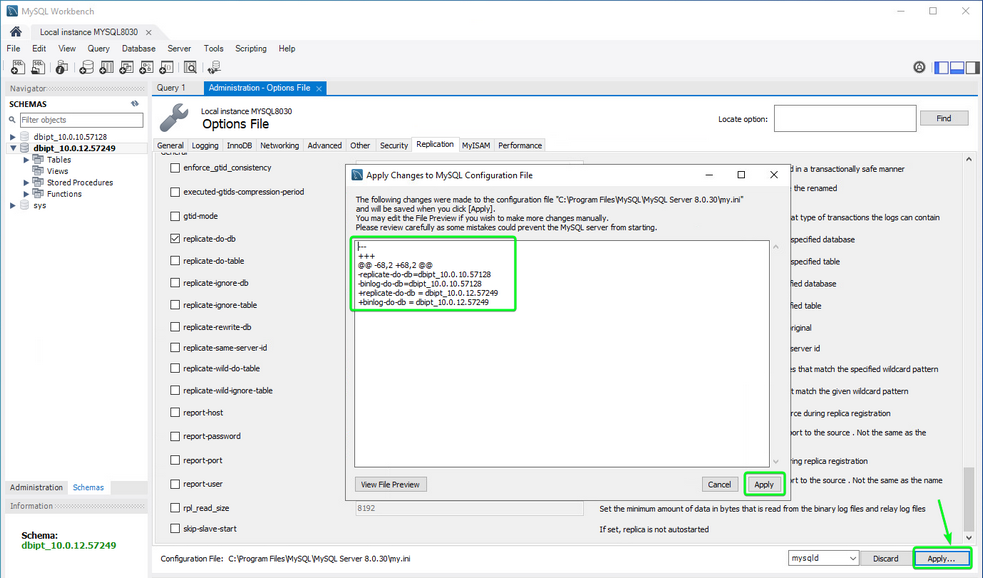
Once you have completed the above changes, click on the “Apply” Button on the bottom right and it will show you a review of the changes made, then again click on the “Apply” button in that pop up window.
If you don’t have Workbench installed on the same server and only have access remotely with Workbench, then you will need to make these changes locally on the server by browsing to the “C:\Program Files\MySQL\MySQL Server 8.0.30\my.ini” (or where your server was installed to)
On Secondary Server
Follow the same steps to Update Application Pool on the Secondary Server Restore DB on Secondary Server
Open MySQL Workbench and connect on the Secondary MySQL server
We will now restore the DB Backup of the new TSS version taken earlier, onto the Secondary Server
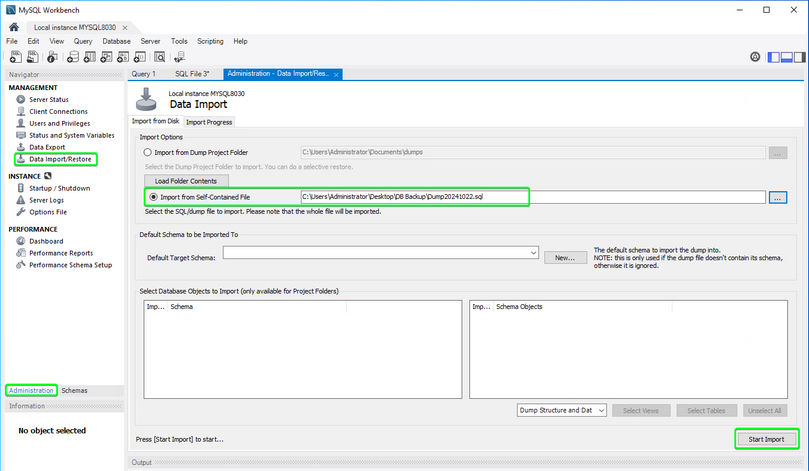
In the Navigator window, Click on the “Administration” tab and then select “Data Import/Restore” and then select “Import from Self Contained File” and point it at the DB Backup file you copied onto the server which was taken on the Primary server earlier, then click on “Start Import”
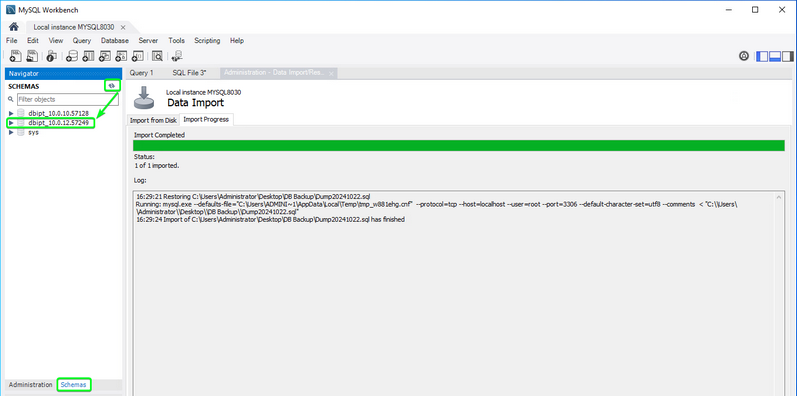
Once the import is complete, click on the “Schemas” tab and then click the “Refresh (icon)” and confirm you see the new restored DB
Now follow the same steps to “Configure MySQL Option file” covered in the Primary Server section above to update and change the “replicate-do-db” and “binlog-do-db” values with the NEW DB name (which was just restored above)
On Primary TSS
Break replication with the Secondary Server.
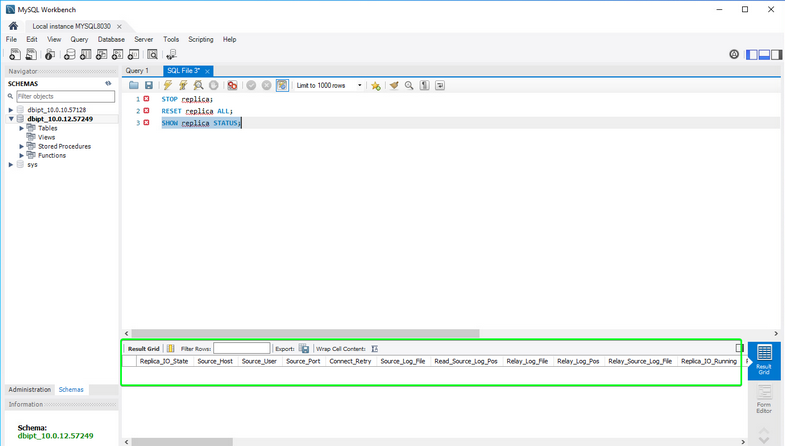
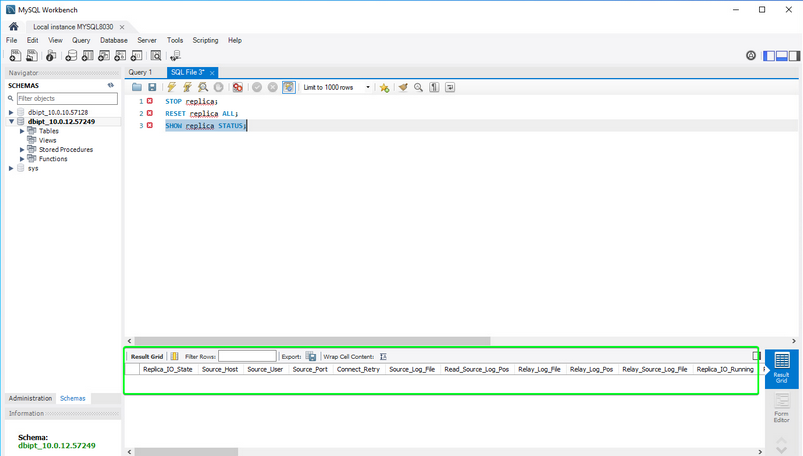
In MySQL Workbench run the following queries (you can highlight all of them and run then in one go)
STOP REPLICA; RESET REPLICA ALL; SHOW REPLICA STATUS;
Once the last query is run from above it should show no replications set in the output
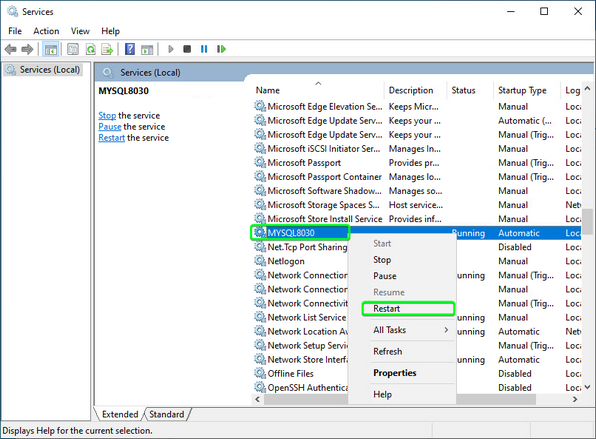
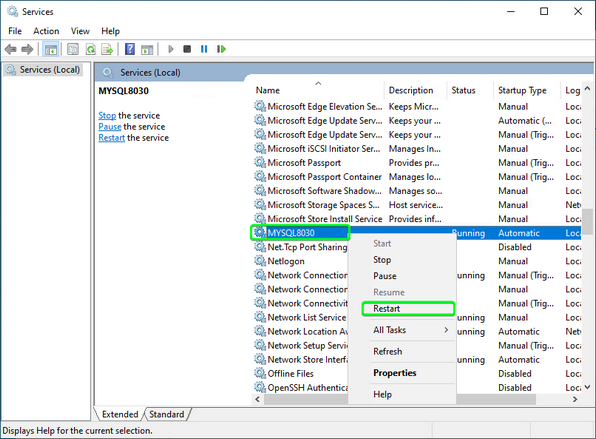
Now we need to restart the MySQL service, to fully take into effect the “Options File / my.ini” changes we made earlier.
In windows services locate the MySQL service and restart it.
On Secondary TSS
Break replication with the Primary Server.
In MySQL Workbench run the following queries (you can highlight all of them and run then in one go)
STOP REPLICA; RESET REPLICA ALL; SHOW REPLICA STATUS;
Once the last query is run from above it should show no replications set in the output
Now we need to restart the MySQL service, to fully take into effect the “Options File / my.ini” changes we made earlier.
In windows services locate the MySQL service and restart it.
Setup Replication on NEW DB Version
These steps will be a mix of commands on both Primary and Secondary Servers
On Secondary Server
Execute following queries on Secondary server in order to get required information to set up replication on Primary server
In MySQL Workbench, run this query
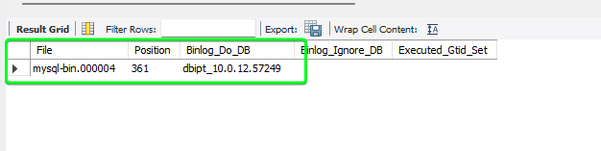
MASTER STATUS;
Note the values output when you run the above on the Secondary Server, these will be used next in the Primary Server.
On Primary Server
Execute following queries on Primary in order to start the replication
STOP REPLICA; CHANGE REPLICATION SOURCE TO SOURCE_HOST='tss-std-02.iptrd.com', SOURCE_PORT = 3306, SOURCE_USER='repl', SOURCE_PASSWORD = Password123', SOURCE_LOG_FILE = 'mysql-bin.000004', SOURCE_LOG_POS = 361, GET_SOURCE_PUBLIC_KEY=1; START REPLICA;
Make sure to change the values before running them SOURCE_HOST = '<Secondary Server FQDN / IP>'
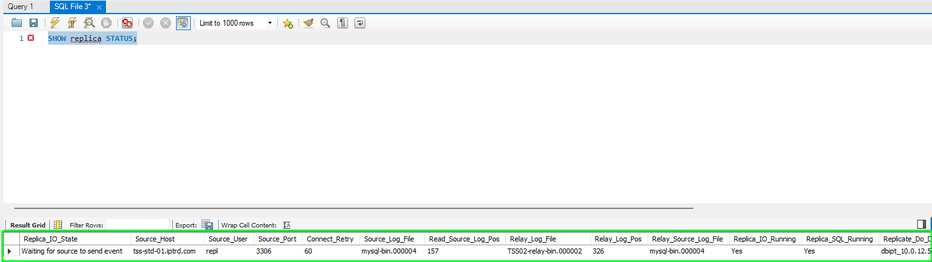
To check if the replication was set, you can run this query
SHOW REPLICA STATUS;
On Primary Server
Execute following queries on Primary server in order to get required information to set up replication on Secondary server
In MySQL Workbench, run this query
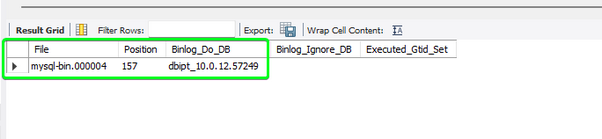
MASTER STATUS;
Note the values output when you run the above on the Primary Server, these will be used next in the Secondary Server.
On Secondary Server
Execute following queries on Secondary in order to start the replication
STOP REPLICA; CHANGE REPLICATION SOURCE TO SOURCE_HOST='tss-std-01.iptrd.com', SOURCE_PORT = 3306, SOURCE_USER='repl', SOURCE_PASSWORD = Password123', SOURCE_LOG_FILE = 'mysql-bin.000004', SOURCE_LOG_POS = 157, GET_SOURCE_PUBLIC_KEY=1; START REPLICA;
Make sure to change the values before running them SOURCE_HOST = '<Primary Server FQDN / IP>'
To check if the replication was set, you can run this query
SHOW REPLICA STATUS;
Upgrade Secondary TSS/Console
Now that we have established replication between the NEW DB versions, we can install the Secondary TSS.
Copy the “TSS-Console-10.1.Y.Z.cab” file to the Secondary TSS Server and extract the contents to a folder.
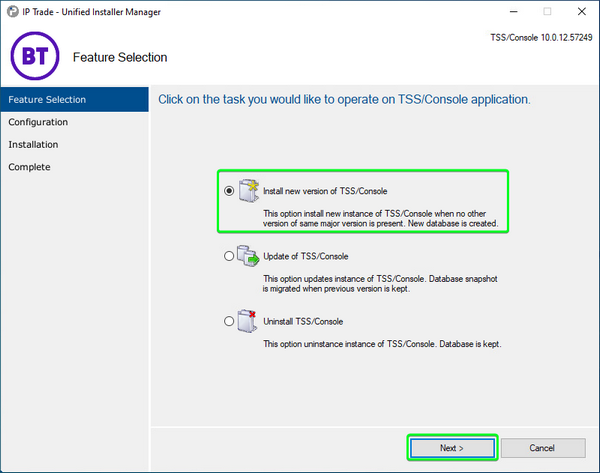
Run UIM upgrade on Secondary TSS, then select “Install new version of TSS/Console” and click Next
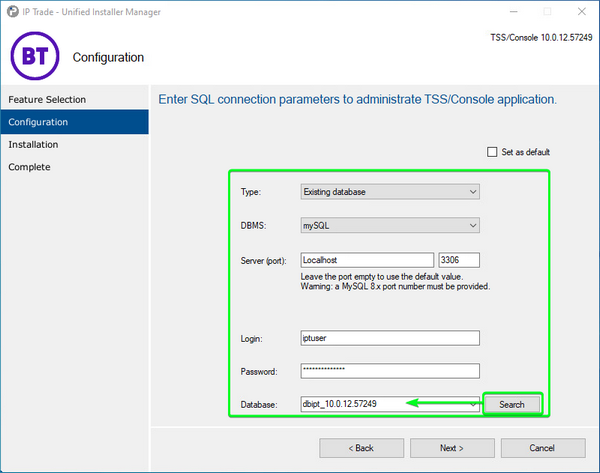
Configuration options: •Type: Existing database •DBMS (Database Management System): mySQL •Server (port): Localhost | 3306 •Login: <DB User> •Password: <DB User Password> Press "Next" button.
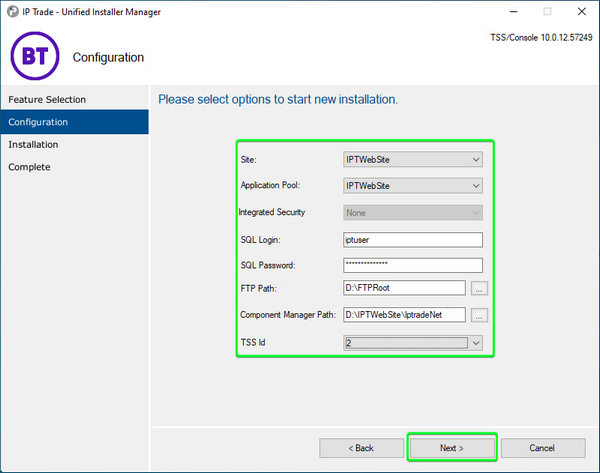
Configuration Options: oSite: HTTP site that will be used. oApplication Pool: Application pool used for this install (BTTrade for latest versions). oSQL Login: Login TSS application will use to connect to mySQL. oSQL Password: Password TSS application will use to connect to mySQL. oFTP Path: Path to the virtual "conf" directory "D:\FTPRoot" oComponent Manager Path: "D:\IPTWebSite\IptradeNet" oTSS Id: 2 Then click "Next"
Next leave all the default values for Syslog (or change them if required) and click “Install”
At the end of the process the following screen is displayed:
The application is now installed in the displayed location and ready to be used. Note the displayed URL for future use.
Log in to the Secondary TSS and verify everything is ok on the new version and that replication is working both ways with Primary Copy and install new firmware into Secondary TSS (this is not replicated)
Update Component Manager URLs for Secure AccessAs part of the TSS Server Install Operating System > Configuring IIS guide, you were instructed To Configure TLS on IIS
All TSS Servers should be secured with certificates. By default the UIM installer will create Console and TSS links with HTTP and the IP address of the server.
To update these links to use HTTPS and FQDN follow this guide: Update Component Manager URLs
Configure and restart test turrets Select a few turrets, typically 2 or 3, to verify and test the newly upgraded Primary and Secondary TSS version. This will help confirm that the upgrade was executed correctly. On new Primary TSS Version•Set all devices firmware to default to new version •Configure at System Zone level <Turret / TPO> > Boot Settings > TSS > Expert> Service base URI and Service alternate URI to point correctly to the new TSS versions •Link a few test turrets to new Primary TSS version in device edition. •Restart test turrets and test basics •If a spare TPO is available, the same can be done to test TPO on new TSS and firmware After basic testing•Link all devices to new upgraded TSS •Reboot all TPO and Turrets to connect on new TSS version
|