Azure - TradeSense Configuration

Top  Previous  Next
Solution Installation > TradeSense Installation > Using the TradeSense in Azure

Azure Tradesense

TradeSense will be available with azure kubernetes services.

In Kubernetes version of TradeSense  below list of functionalities will not be available by default. User need to add settings as per their requirement.

1. Voice Recording

Setting to enable/disable Voice recording functionality.

application.global.assure.feature.voicerecording.enabled = true/false

2. Walk the floor

Setting to enable/disable Walk The Floor functionality.

application.global.assure.feature.wtf.enabled = true/false


Azure Tradesense Deployment file

While TradeSense deployment, environment should contain below variables.

•name: DEPLOYMENT_TYPE

         value: azure

OAuth Authentication

For supporting OAuth Authentication in Azure TradeSense, assure pod should be deploy with below mandatory environment variables

name: OAUTH_CLIENT_ID

value: "<client id>"

name: OAUTH_CLIENT_SECRET

value: "<client secret>"

name: OAUTH_TENANT_ID

value: "<tenant id>"

name: OAUTH_REDIRECT_URL

value: "<fqdn of tradesense>"

name: OAUTH_ADMIN_ROLE_ID

value: "<admin role id>"  


Azure MSSQL Authentication in TradeSense Using EVA(Hashicorp Vault)

For supporting this MSSQL Authentication using EVA in Azure TradeSense, assure pod should be deploy with below mandatory environment variables

name: AZURE_CLIENT_ID

value:"<client id>"

name: AZURE_TENANT_ID

value:"<tenant id>"

name: AZURE_CLIENT_SECRET

value:"<client secret>"

Azure Email Configuration

 
For supporting Email in Azure TradeSense, assure pod should be deploy with below environment variables.                                                                                                                      

name: SMTP_HOST                                                                                                                                    

value: "<smtp server>"  

name: SMTP_USERNAME                                                                                                                                                                                    

value: "<smtp username>"                                                                                                                                            

name: SMTP_PASSWORD                                                                                                                                                                                  

value: "<smtp password>"        

name: SMTP_FROM_ADDRESS                                                                                                                                                                

value: "<from address>"                                                                                                                  

name: SMTP_PORT                                                                                                                                                                                        

value: "<smtp port>"

name: SMTP_EMAIL_RECIPIENTS                                                                                                                                                                                        

value: "<email recipients>"

name: SMTP_DISPLAY_NAME                                                                                                                                                                                        

value: "<display name>"

name: SMTP_SECURITY                                                                                                                                                                                        

value: "<connection security>"
 
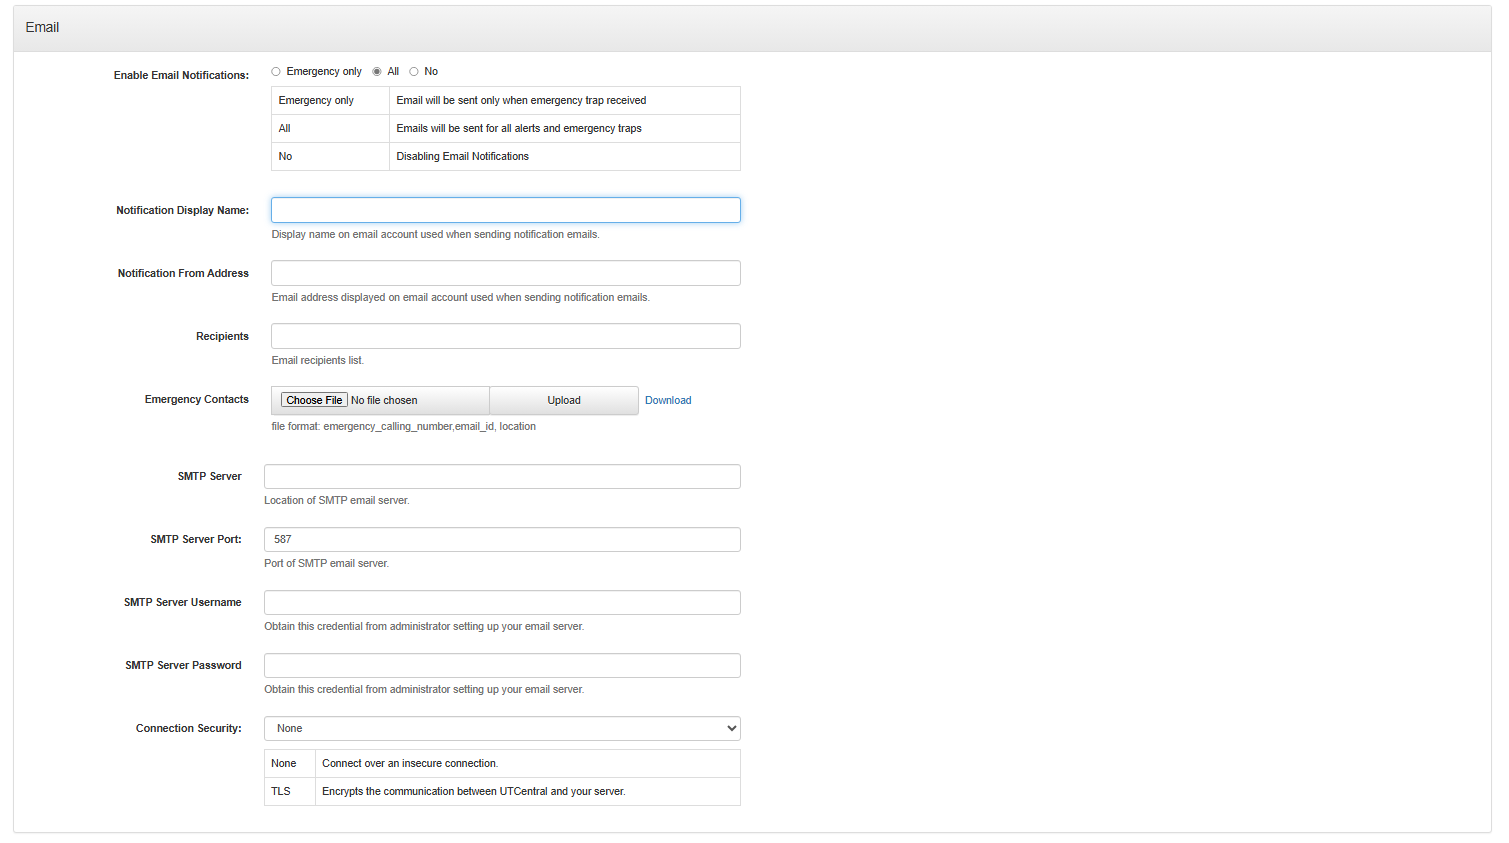
Above details will be populated in assure->alerting->configuration->email configuration and they will be read only, user cannot be able to edit.

If these environment variables not configured then user can configure them from assure->alerting->configuration->email(refer image below).

Email_config

Proxy Configuration

The following environment variables need to be added or updated in the Assure deployment configuration file to enable proxy support:


name:HTTP_PROXY


value:"<http proxy>"


name:HTTP_PROXY_USERNAME


value:"<http proxy username>"


name:HTTP_PROXY_PASSWORD


value:"<http proxy password>"


name:HTTPS_PROXY


value:"<https proxy>"


name:HTTPS_PROXY_USERNAME


value:"<https proxy username>"


name:HTTPS_PROXY_PASSWORD


value:"<https proxy password>"


Ensure these variables are correctly set to allow authenticated HTTP/HTTPS traffic through the proxy as required by the deployment environment.


TableCornerTopLeftA

IPT_Empty

IPT_Empty

TableCornerTopRightA

IPT_Empty

ImportantNote_Icon

DB_PASSWORD Environment variable should not be there in deployment file.

IPT_Empty

TableCornerBottomLeftA

IPT_Empty

IPT_Empty

TableCornerBottomRightA


Logging Configuration


Add or update the following environment variable in the Assure deployment configuration file to change the logging behavior.


name:LOGGING_TYPE


value:"<logging type>"


Expected values: local or  cloud


Node Type Configuration

Add or update the following environment variable in the Assure deployment configuration file to define the node type and its corresponding operational behavior.

name: NODE_OPERATION


  value: "<node type>"

Expected values: CTI, MONITORING, or BOTH

•CTI: When the node type is set to CTI, it functions as a CTI server. In this mode, all monitoring features including SNMP Gets, SNMP Traps, and ICMP Pings are disabled.

             The message "This is a CTI Node. Monitoring (SNMP Gets, SNMP Traps, ICMP Pings) disabled" will be displayed in the TradeSense UI for the associated devices.

•Monitoring: When the node type is set to Monitoring, it operates as a monitoring server. In this mode, CRM,Call-related features are disabled.

       The message "This is a Monitoring Node. CRM disabled" will be displayed in the TradeSense UI.

•Both: When the node type is set to Both, all features including CTI and monitoring are enabled and operate normally.
 

Tradesense User Role Management - Assigning Roles for Microsoft users

The steps to register and give the user a role are listed below.

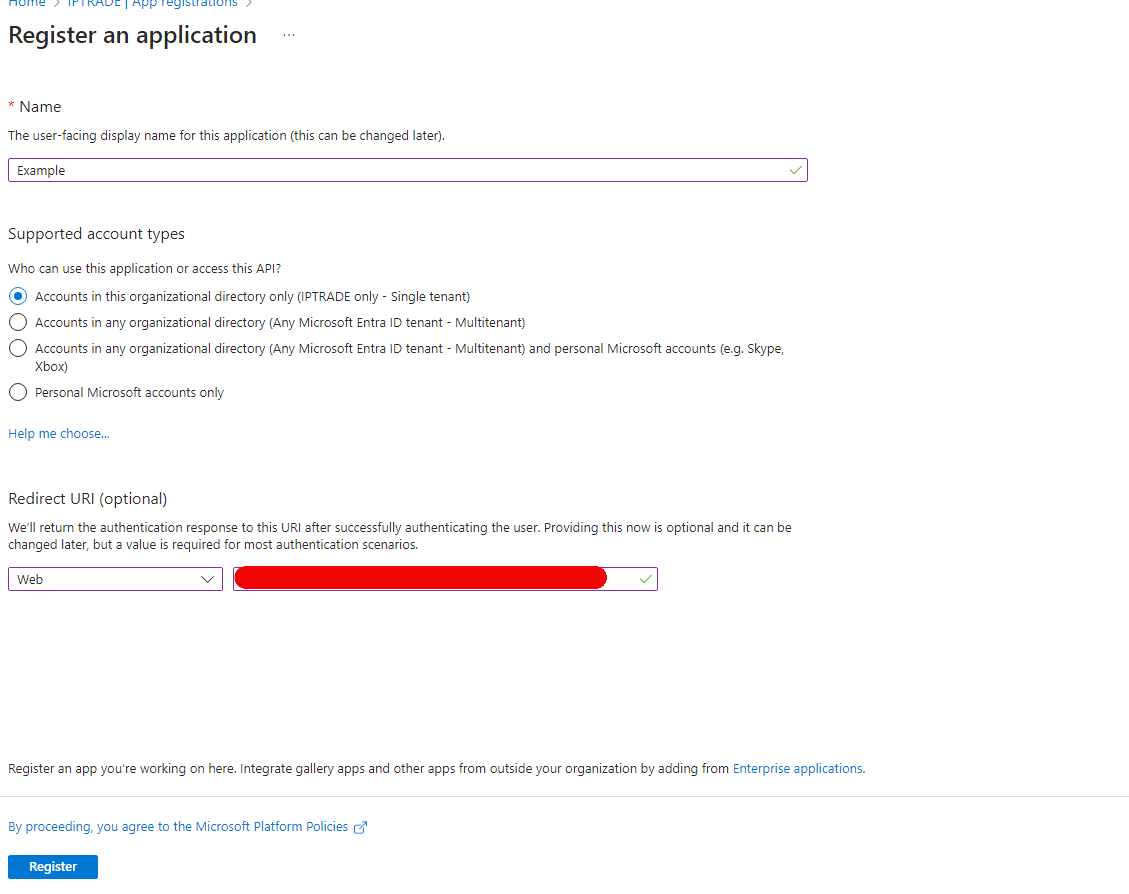
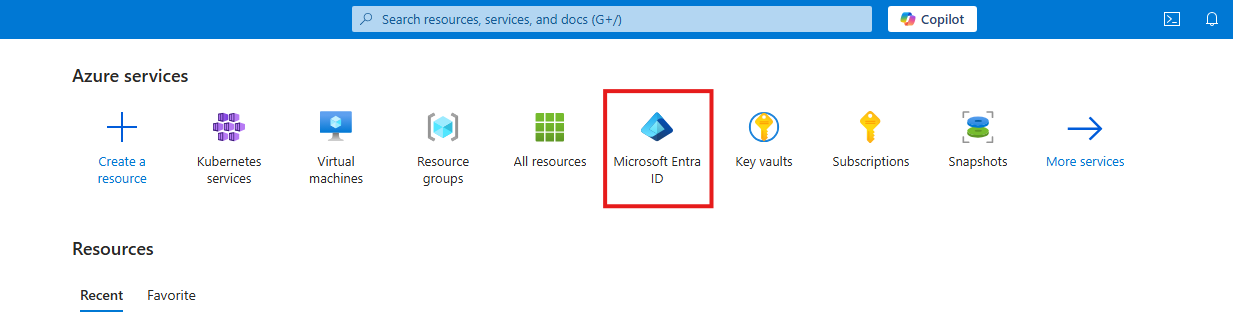
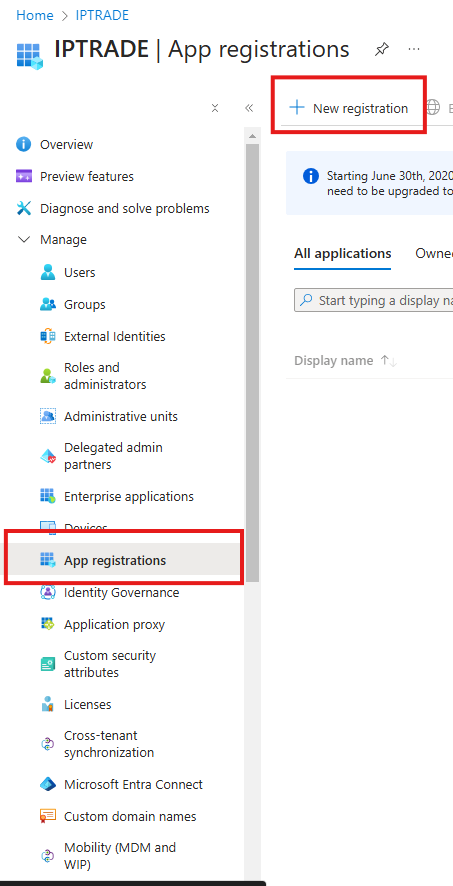
   Step 1:- After Logging into Azure portal Navigate to Microsoft Intra Id -> App Registrations -> + New registration

clip0237

clip0239

   Step 2:- Fill the details as per the requirement. In Redirect URI Section select the platform as web and URL would be <https://<tradesense-fqdn>>/assure/auth/callback

clip0240

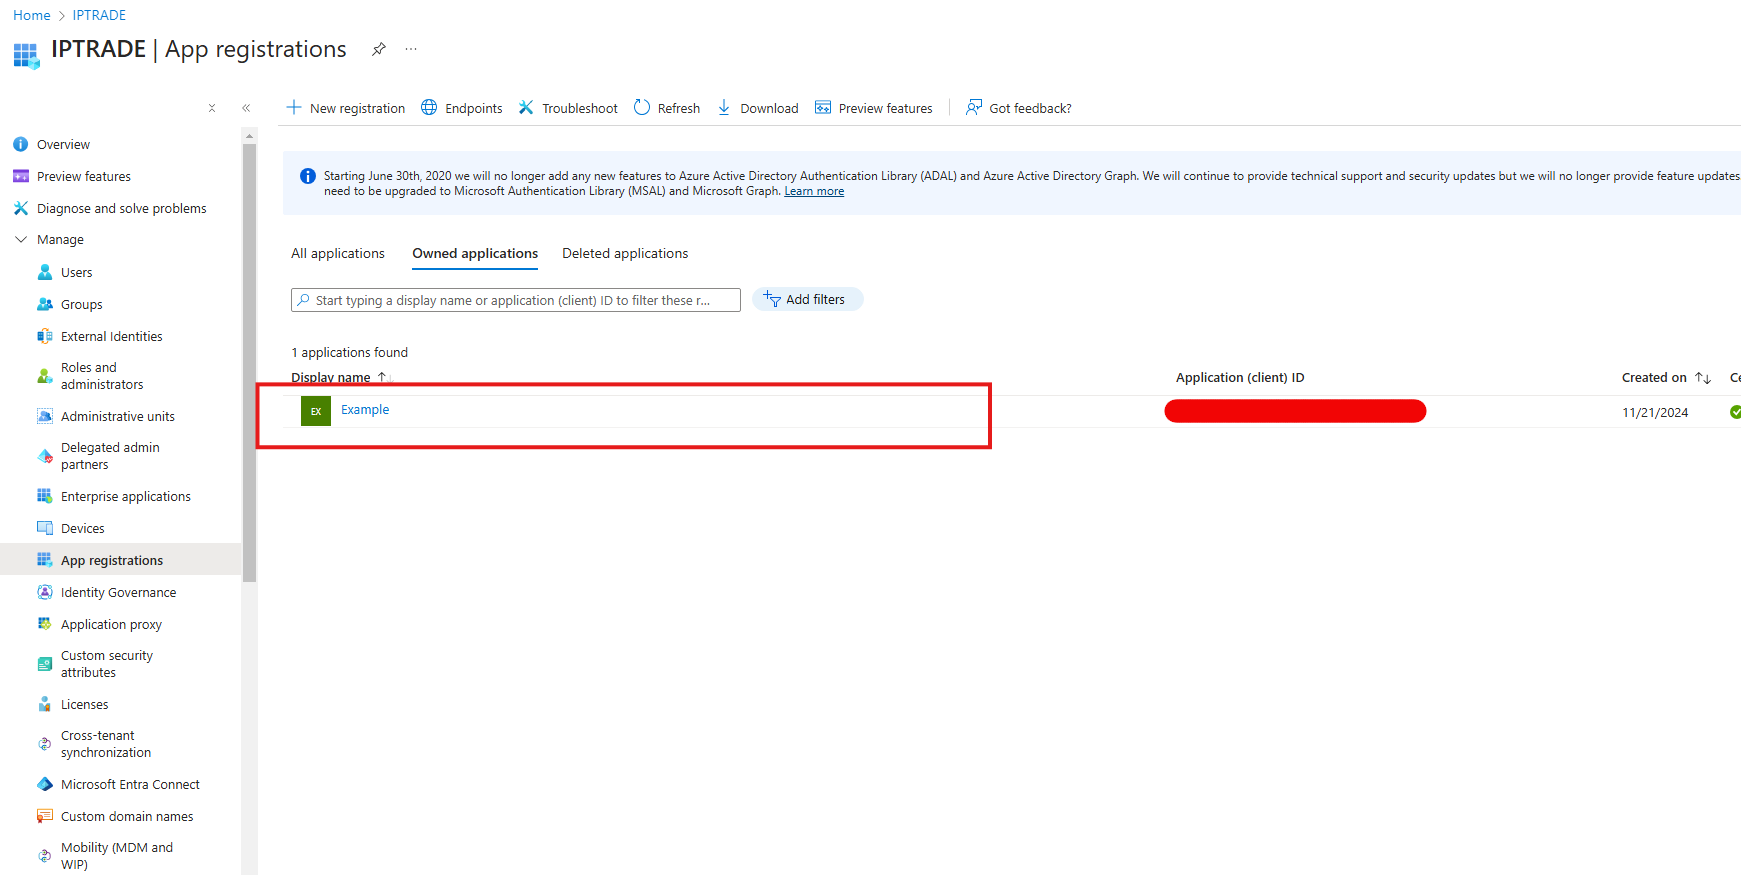
   Step 3:- Register details and refresh the page, there you will find the app which you have registered

clip0251

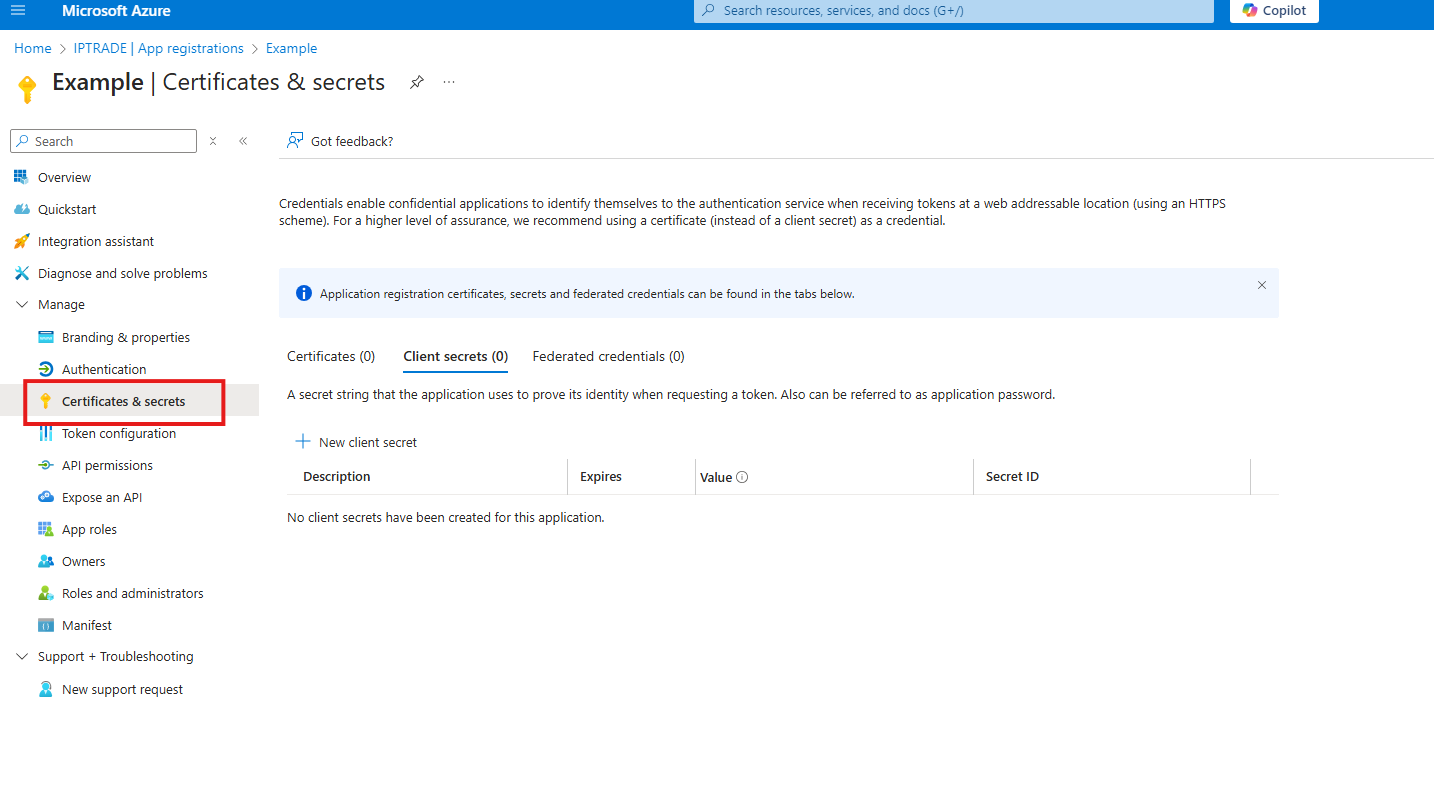
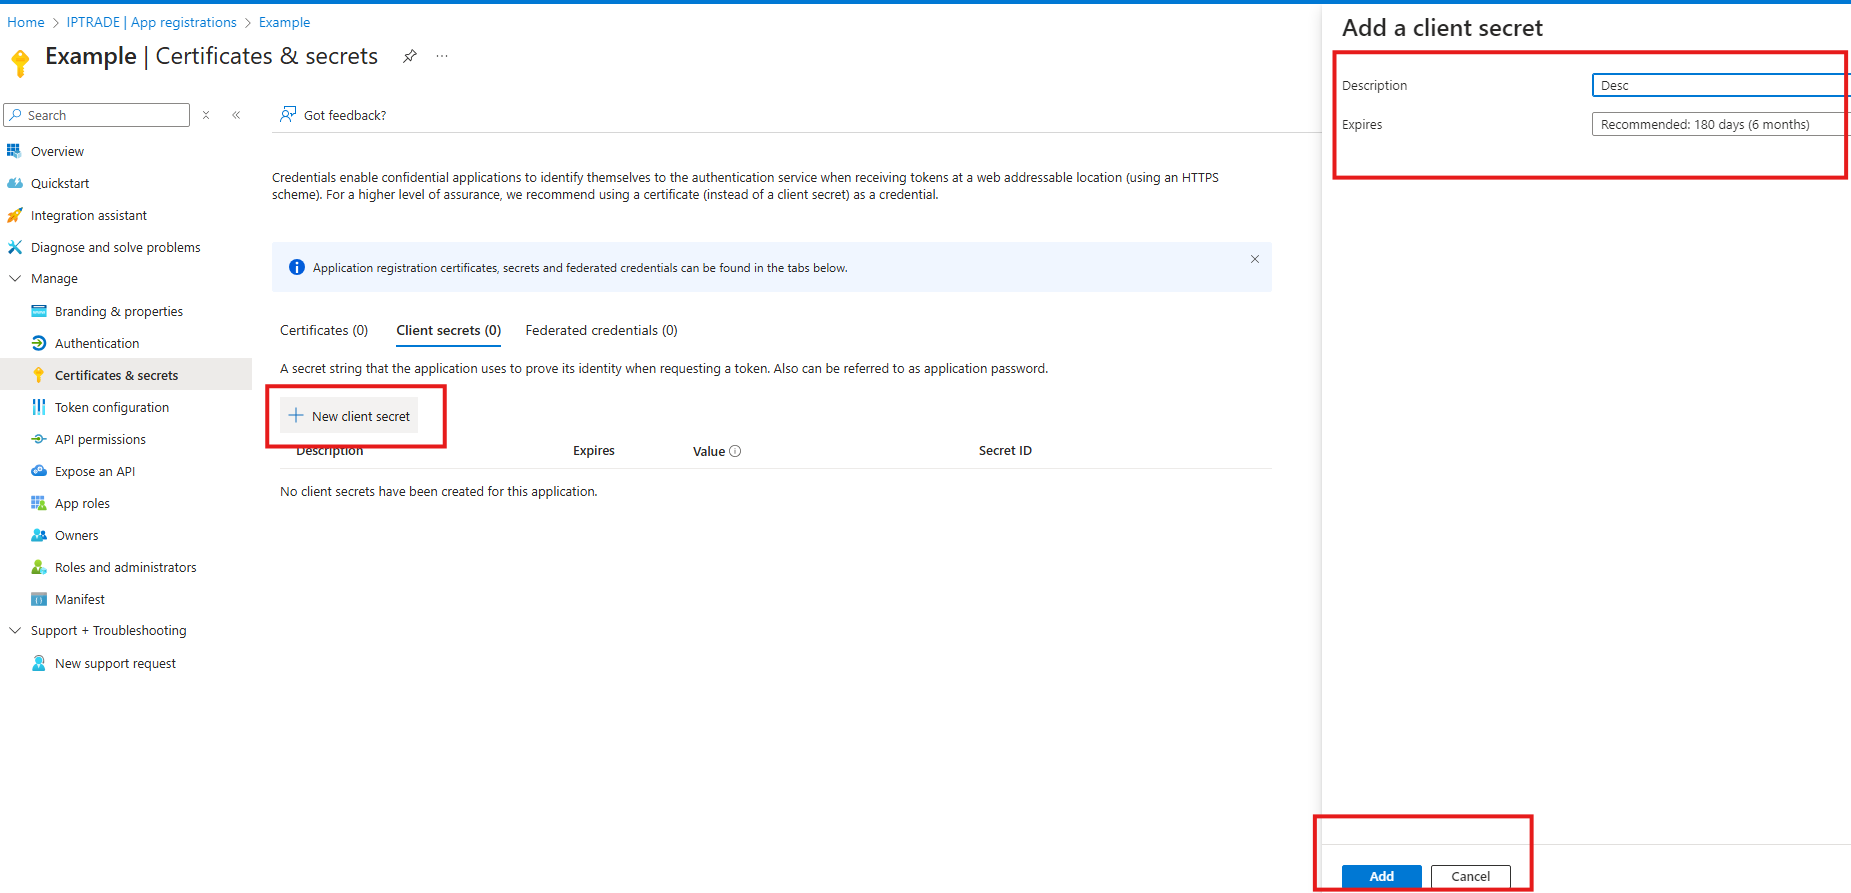
   Step 4:- Click on the application which you have registered and create a secret by clicking on certificate & secrets

clip0241

   Step 5:- Copy the value of certificate and store that in env variable with YAML file with the KEY (OAUTH_CLIENT_SECRET)

clip0242

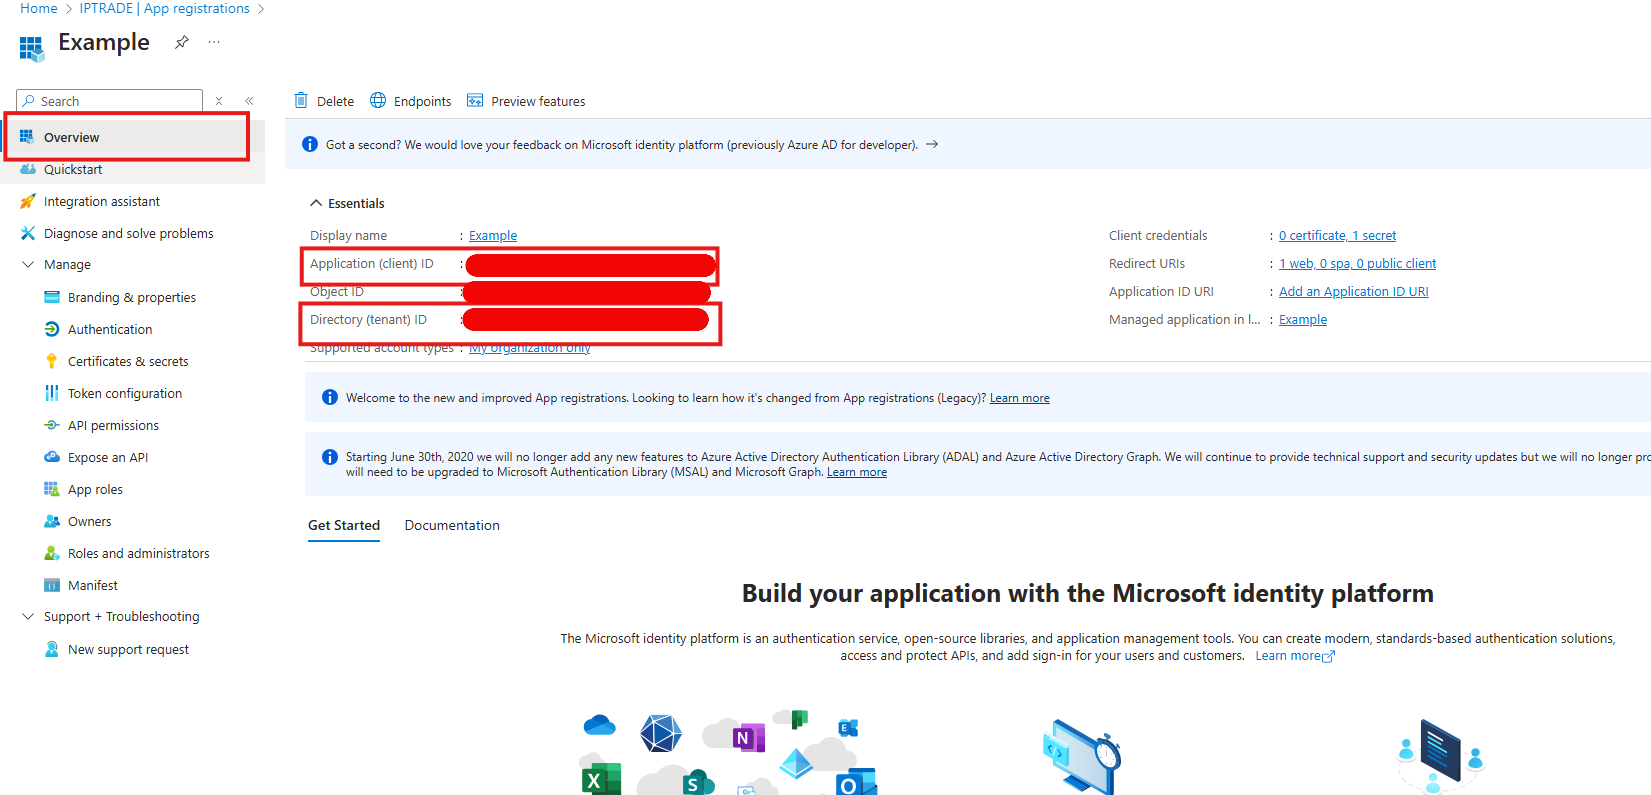
   Step 6:- Click on Overview -> Copy the values of client id , tenant id and store that in env variable with YAML file with the KEY ( OAUTH_CLIENT_ID, OAUTH_TENANT_ID )

clip0244


   Step 7:- Add another key OAUTH_REDIRECT_URL with the value fqdn of the TSN for ex:- load-ts.qc.iptrade-networks.com

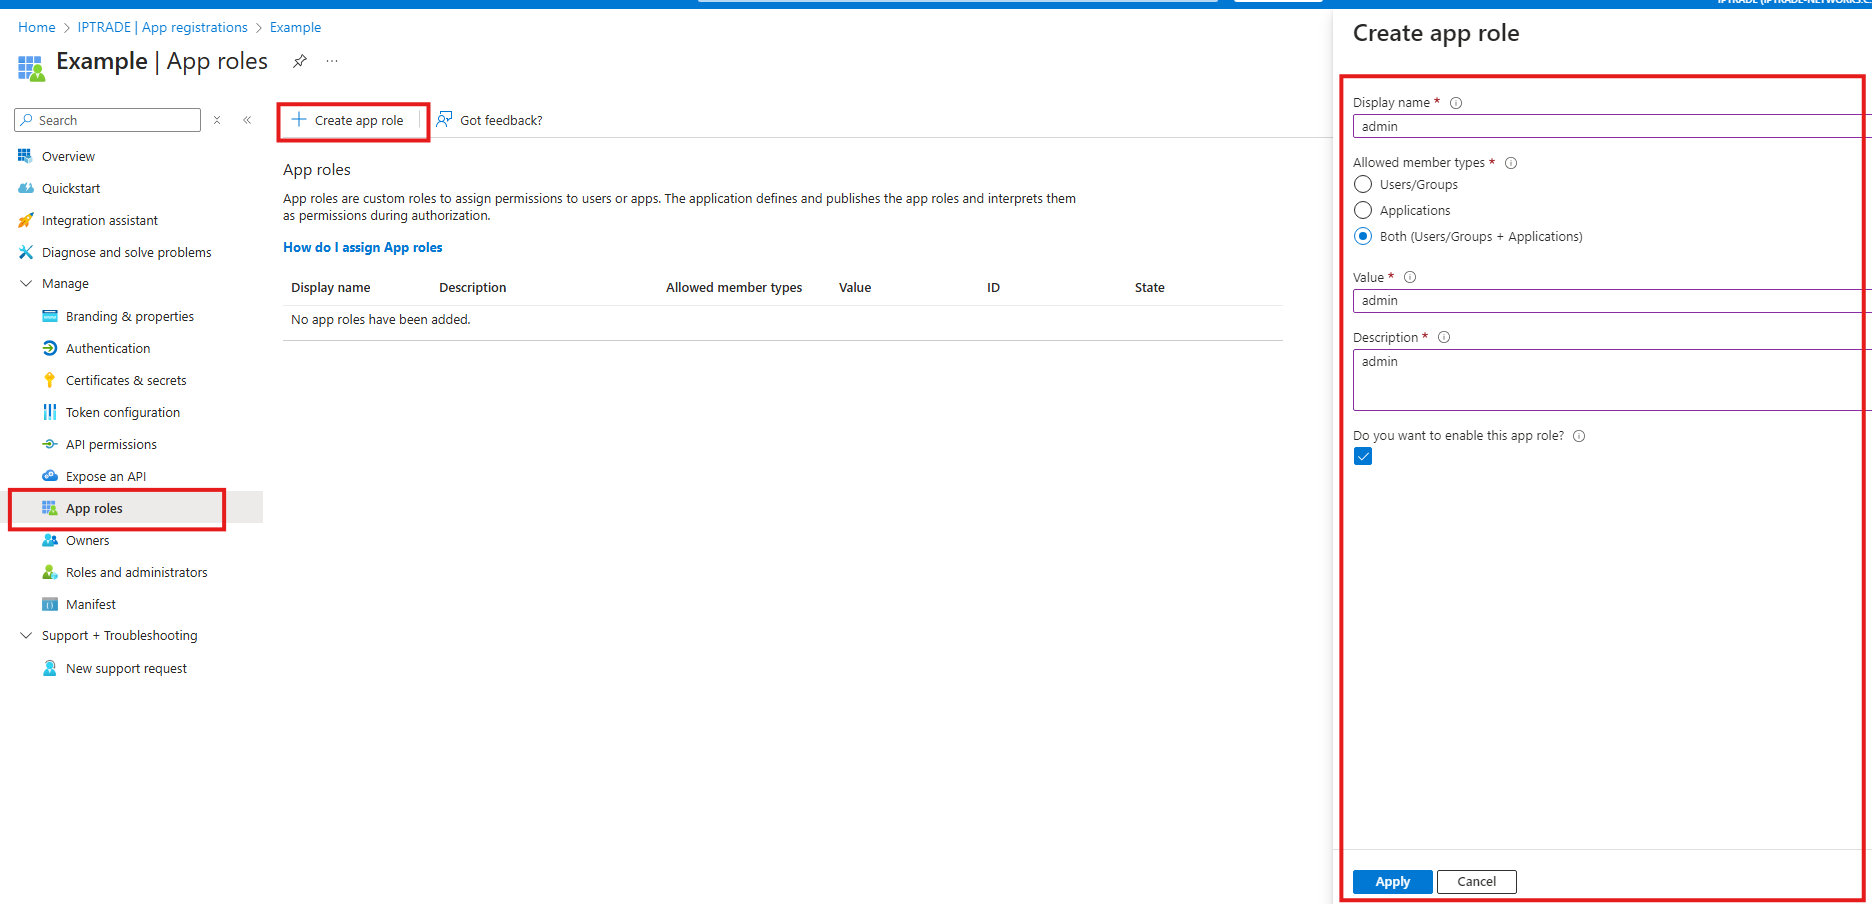
   Step 8:- Add roles by navigating to the App roles of the Application

clip0246


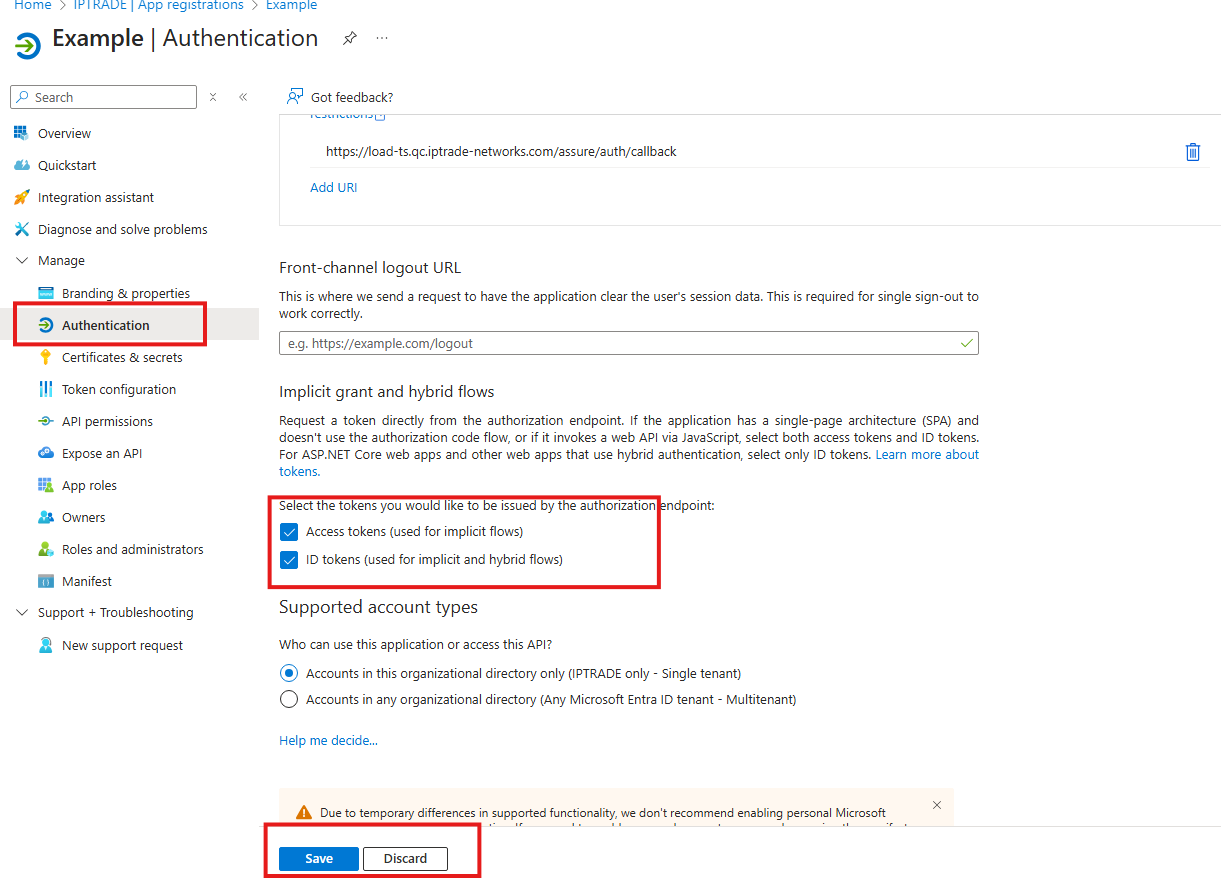
   Step 9:- Click on Authentication and enable Access Token and Id Token

clip0247


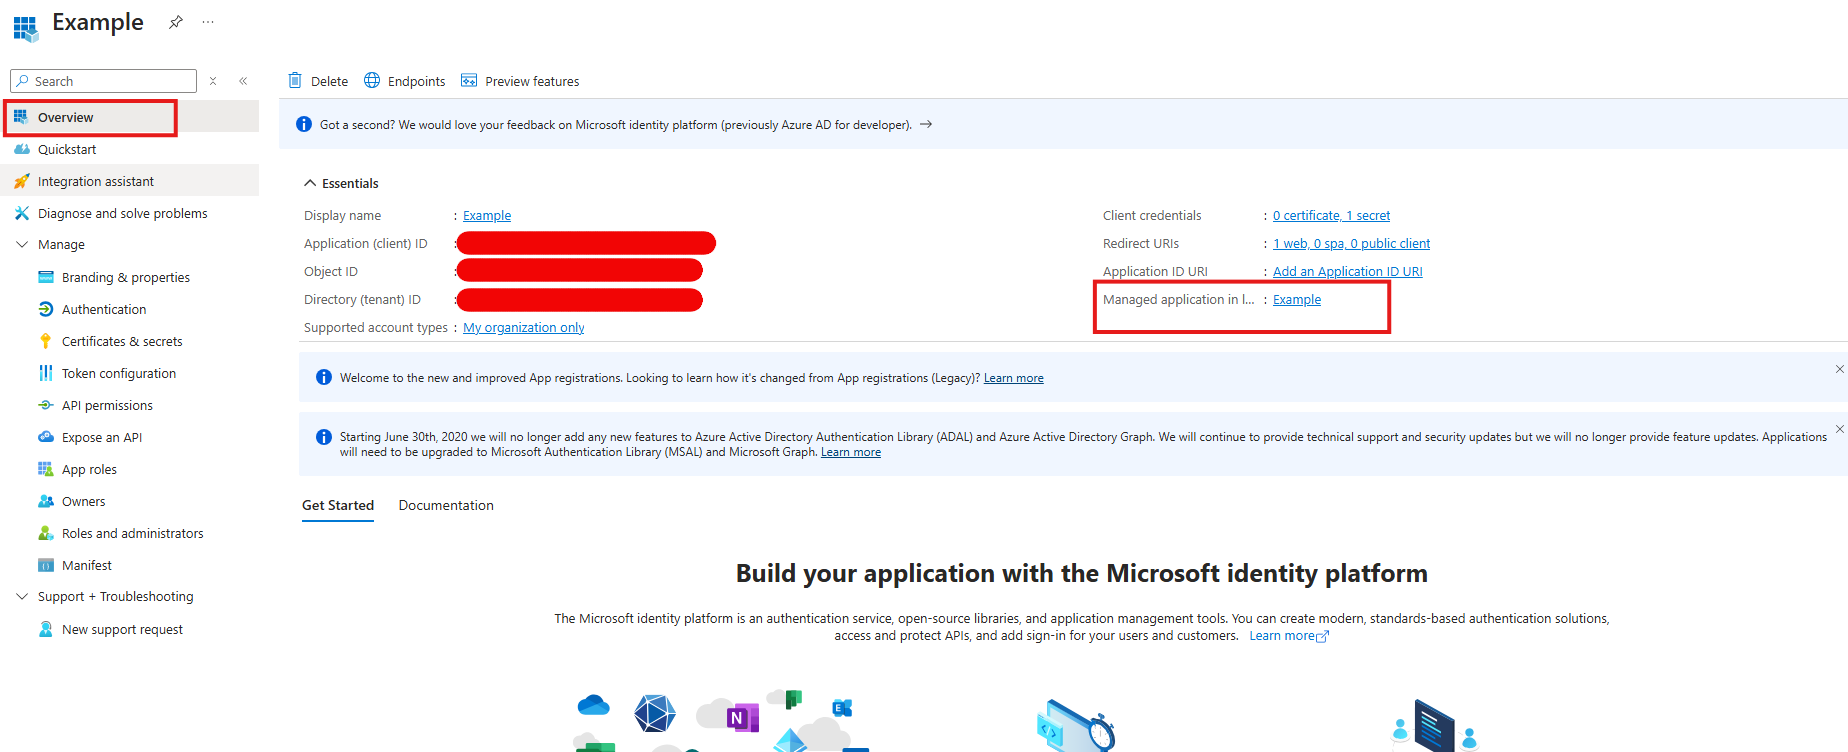
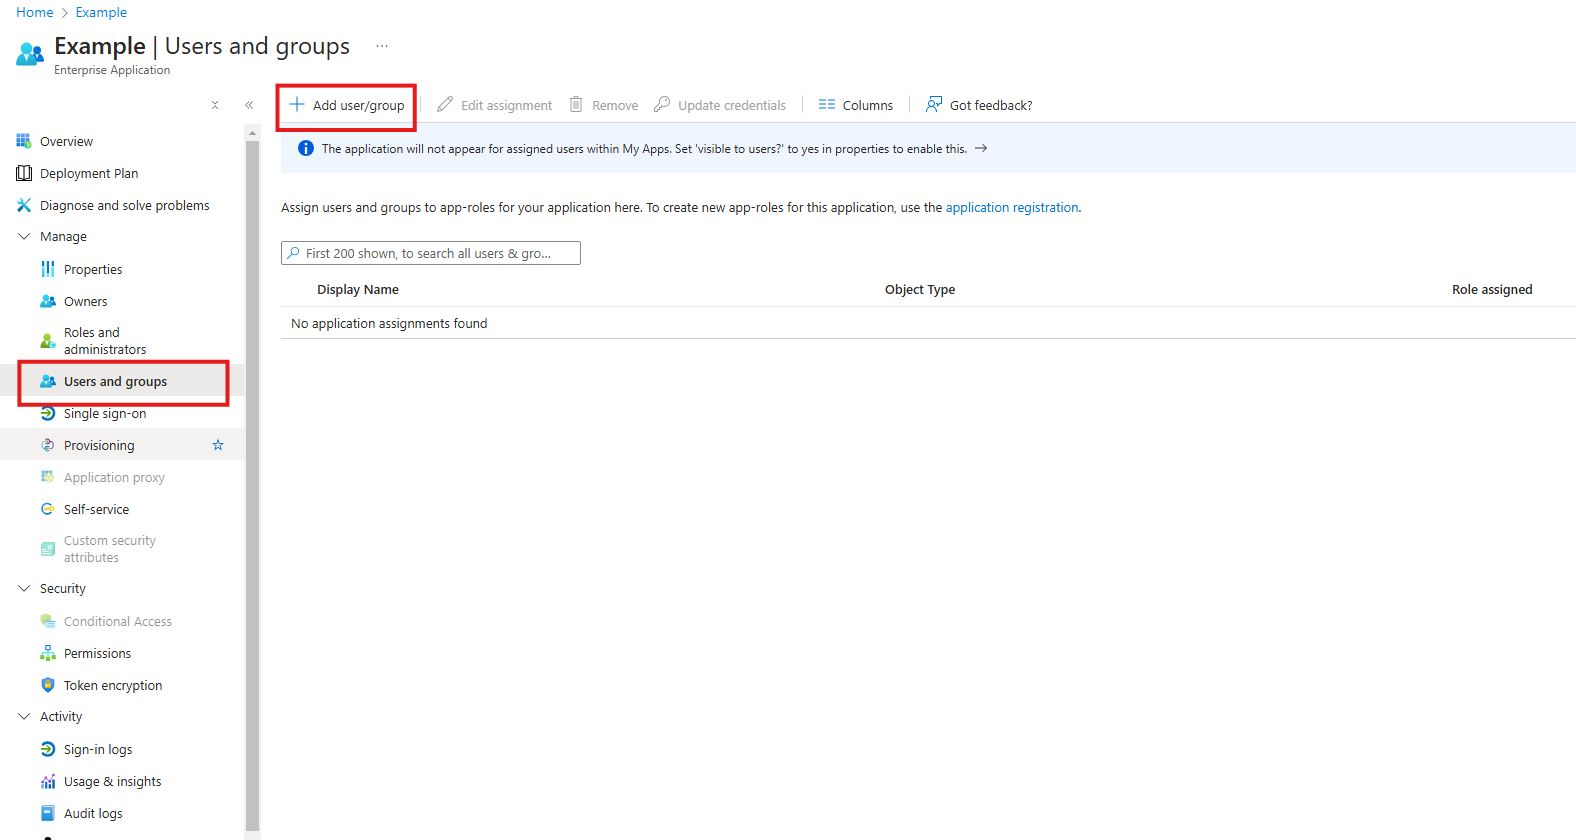
   Step 10:- Assign the roles to the users by navigating to overview -> Managed application -> Users and Groups

clip0248

clip0249

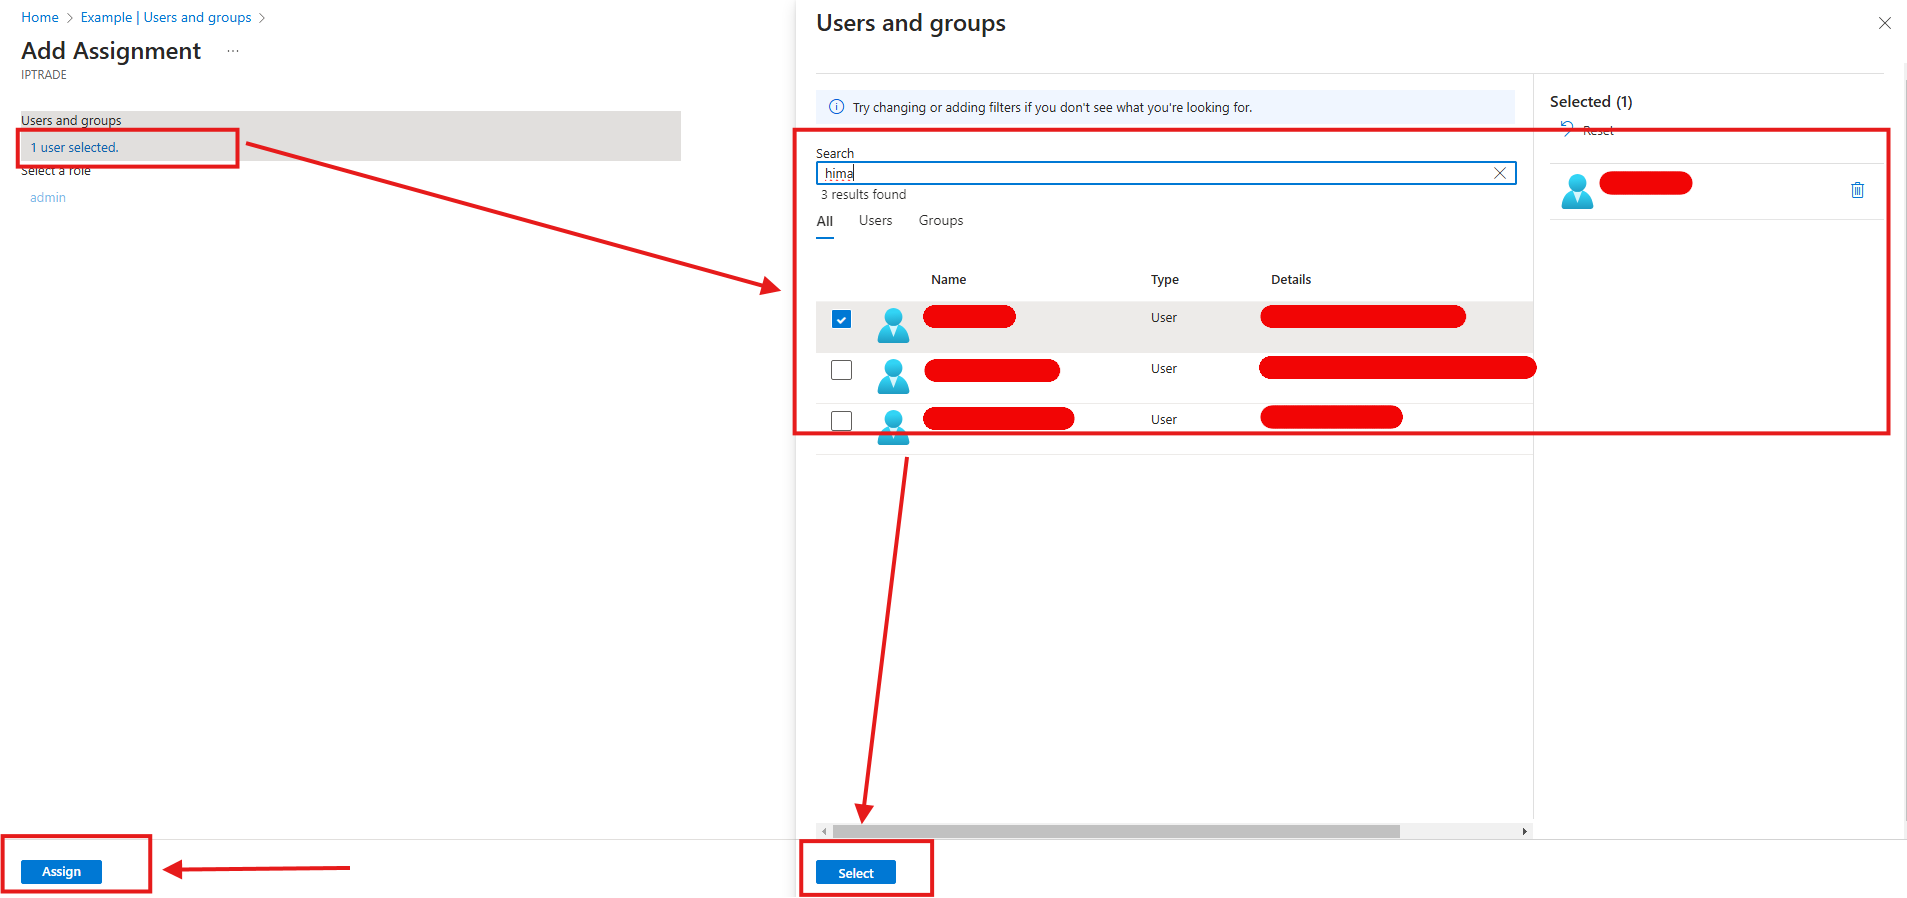
Step 12: Click on none Selected -> Search and select the user and click assign

clip0250


TableCornerTopLeftA

IPT_Empty

IPT_Empty

TableCornerTopRightA

IPT_Empty

ImportantNote_Icon

After assigning it's not required to provide admin role ID in Environment Variables

IPT_Empty

TableCornerBottomLeftA

IPT_Empty

IPT_Empty

TableCornerBottomRightA


TableCornerTopLeftA

IPT_Empty

IPT_Empty

TableCornerTopRightA

IPT_Empty

ImportantNote_Icon

When the user role will be edited tehn it will automatically reflect in the Tradesense UI.

IPT_Empty

TableCornerBottomLeftA

IPT_Empty

IPT_Empty

TableCornerBottomRightA