CUCM, User/device accounts


CUCM, User/device accounts |
|
| Solution Installation > Turret/Console Installation > PBX Lines provisioning |
This section discusses which operations must be provisioned in the Cisco UCM configuration in order to enable attendant/turret user/device registration to the PBX. There must be at least one Cisco device/user/line set configured for each user account defined in the console/TSS configuration. Optionally, additional Cisco devices/user/lines set can be configured and associated to the user or to the guest access on the console. Note that some adjustments to the procedure below might be required depending on your particular environment. Attendant user account(s) IT & voice administrators must proceed as follows to create device/user/line resources in to the Cisco UCM configuration. These resources will have to be associated to an attendant’s user account using the line fetch mechanism as described later on in this document. Some additional notes •Since several Cisco device/user/line can register from the same physical attendant console device, we suggest using the following naming convention when specifying the MAC address of the Cisco device (device names are expected to be unique). Create IT & voice administrators must proceed as follows 1)Open Cisco Unified Administration console from your preferred Internet navigator and log onto the system with administration privileges ;
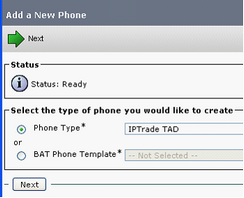
2)From the main menu, select Device | Phone ; from the List Phones pane, press Add New button ; 3)In the Add a New Phone pane, select IPTrade TAD in the Phone Type drop-down list and press Next button ; 4)Fill in the Phone Configuration form as follows ; press the Save button to commit changes, acknowledge any confirmation message and check that the Add successful message is displayed ; a)Set MAC Address to <device MAC number> (see note above) ; b)Give a free text text-description (display field only) – or accept the default SEP<MAC-address> ; c)Select the appropriate device pool ; d)Set Phone Button Template to IPTrade TAD SIP default ; e)Select the appropriate Calling Search Space, AAR Calling Search Space, and Location as defined in the Cisco UCM ; f)The Media Resource Group List will be used as defined in the device pool (so leave on <None> here) ; g)The Presence Group parameter can use the default value ; h)The MTP Preferred Outgoing Codec is 711ulaw and will be greyed out ; i)Select for device security profile from the drop-down IPTrade TAD - Standard SIP Digest Profile j)Change the Rerouting Calling Search Space to the relevant Search space that this phone is allowed to reach and reroute calls too k)Change the SUBSCRIBE Calling Search Space to the relevant Search space that this phone is allowed to reach l)For SIP Profile select from the drop-down the Standard SIP Profile ; Create IT & voice administrators must proceed as follows 5)From the main menu, select User Management | End User; from the List Users pane, press Add New button ; 6)Fill in the End User Configuration form as follows and press the Save button to commit changes a)Give a unique User ID that is easy to remember for the respective user ; b)Give a unique Password and PIN-code for each user ; c)Other fields like Last Name, Middle name, First Name, Mail ID, Manager User ID and Department are free text-fields of which only the Last Name is a required field : d)The Telephone Number must be the primary extension for the attendant ; e)The User Locale should indicate the default <None> f)Give the digest credentials for this user g)Confirm the above credentials once more in the Confirm Digest Credentials text-field h)Verify that the presence group parameter is indicating Standard Presence Group i)Verify that the radio-button Allow Control of Device from CTI is checked
Create device/user association IT & voice administrators must proceed as follows 7)Open the End User Configuration form of the newly-created user and select Device Association ; 8)Type in the name of the name of the Cisco device as specified in the section above ; 9)Select the radio-button in front of the Cisco device name ; 10)Press the Save Selected/Changes button ; 11)Verify the device association has been correctly applied ;
Create user/line/ device association IT & voice administrators must proceed as follows 12)From the main menu, select the Device > Phone pane , locate the newly-created device in the list and open the Phone Configuration form by clicking on the device’s name in the list ; 13)In the Protocol Specific Information section, set Digest User to the User ID created above, press the Save button and acknowledge any confirmation message ; 14)Click on the Line [1] – Add a new DN in the Association Information list (top-left part of the screen) ; the Directory Number Configuration form is displayed ; 15)Fill in the Directory Number form as follows and press the Save button to commit changes a)Give the directory number that is reserved for this user’s primary line-appearance b)Select the route-partition as per the active dial plan ; c)Give a free text-description in the Description field – example ‘Line 1 Console 1’ d)Give a free (and the same for both) text-description in the Alerting name and ASCII Alerting name – this is the name that will be seen on other display-phones when they dial the console’s primary line (internal call) ; e)Make sure the Active radio button is checked ; f)Select the relevant Voice Mail Profile if a voice mail is required for this line g)Select the Calling Search Space as per the active dial plan ; h)Select the relevant Call Pickup Group from the drop-down box if pickup is configured ; i)Chose for presence group Standard Presence Group from the drop-down box j)Other parameters in the Directory Number Settings section can be left to their default values k)Call Forward and Call Pickup Settings can be configured as per every other phones l)Do not change any MLPP settings m)The Display (internal caller id) is the text-field specifying which is displayed for internal calls to this console (instead of the number) ; n)ASCII Display (internal caller id) is the same as the above o)External Phone Number Mask – here it is possible to indicate the main number for a site so that individual extension numbers are not visible to the outside world (if it is required to avoid external parties to call the console directly). It is also possible to use wildcards to add a digit-pattern to an extension number. p)Configure the maximum number of calls as 64 q)Configure the busy trigger as 62 Guest account Configuring the guest account for consoles involves the same steps as described in the paragraph above. The only difference is that IT & voice administrators can specify the device type as Third-party SIP Device (basic) rather than IPTrade TAD and hence save license points. |