Overview
This section describes how to proceed to manual new install of TSS/Console application.
Procedure contains following steps :
 Warning Warning
This procedure describes installation of Console application from version 8.0. When package version is inferior to 8.0 please refer to proper documentation version.
|
Create new database
This procedure describes how to create database used by TSS/Console application.
•Open SQL Server Management Studio •Connect to server where you want to store database •Right click on Database > New Database... •Define database name: dbipt_10.1.Y.Z
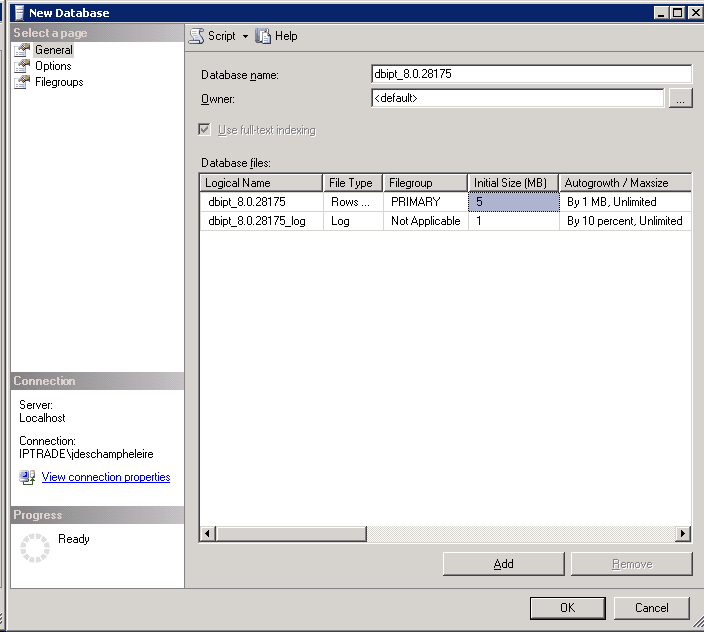
•Press on Options •Set Collation : Latin1_General_CS_AS •Press OK to confirm
Create SQL user
This procedure describes how to create user used to connect to database.
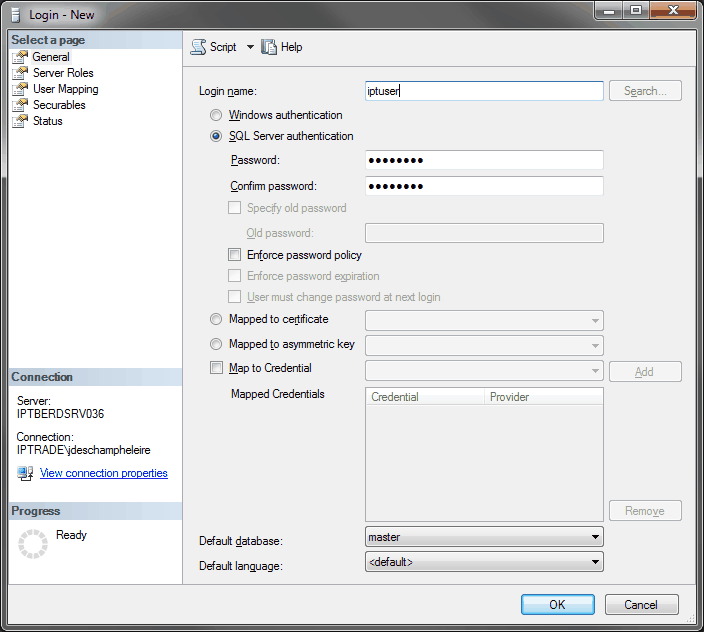
•Open SQL Server Management Studio •Select Security > Logins •Right click on Logins > New Login... •Set login name: iptuser •Select SQL Server authentication •Set password: azerqsdf •Confirm password: azerqsdf •Uncheck box Enforce password policy
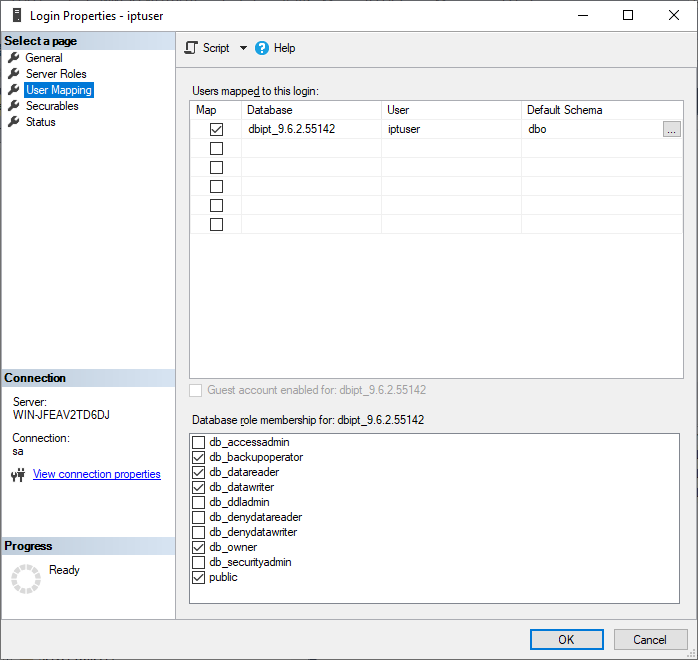
•Select User Mapping page •Check previously created database •Check db_backupoperator, db_datareader, db_datawriter and db_owner as role membership
•Press OK to confirm
Execute SQL scripts
This procedure describes how to populate database. Execute following SQL scripts of folder ‘Init Scripts’ on new created database:
•01_CreateDataBase.sql •02_UniqueIdentifiers.sql: This script must be executed n time (where n is number of TSS/Console used with redundancy/replication: 1 to 6) oopen script oreplace @SYS_UID@ and @IDENTIFIER@ by following string in this table :
Number of TSS/Console
|
@SYS_UID@
|
@IDENTIFIER@
|
1
|
1: SYS_UID1
|
1: 00000
|
2
|
1: SYS_UID1
2: SYS_UID2
|
1: 00000
2: V0000
|
3
|
1: SYS_UID1
2: SYS_UID2
3: SYS_UID3
|
1: 00000
2: L0000
3: g0000
|
4
|
1: SYS_UID1
2: SYS_UID2
3: SYS_UID3
4: SYS_UID4
|
1: 00000
2: F0000
3: U0000
4: j0000
|
5
|
1: SYS_UID1
2: SYS_UID2
3: SYS_UID3
4: SYS_UID4
5: SYS_UID5
|
1: 00000
2: C0000
3: O0000
4: a0000
5: m0000
|
6
|
1: SYS_UID1
2: SYS_UID2
3: SYS_UID3
4: SYS_UID4
5: SYS_UID5
6: SYS_UID6
|
1: 00000
2: A0000
3: K0000
4: U0000
5: e0000
6: o0000
|
oexecute script orepeat operation for each TSS/Console instance •03_InitialSettings.sql •04_SoundEvent.sql •05_Ringtone.sql •06_RingtoneSet.sql •07_Permissions.sql •08_Policy.sql •09_Users.sql
Install Console application
•Copy folder 'Console' of package to folder where points site IPTWebSite (to get this information, open IIS, select site and click on Basic Settings... button. Information is given by Physical Path textbox. ie: D:\iptwebsite\) and rename it to 'IptradeNet.Console.10.1.Y.Z' (version number depends of your installed version number)
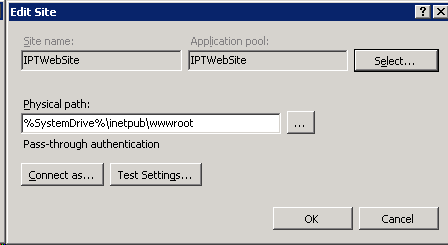
•Open IIS •Right click on folder application and click on Convert to Application •Click on button Select... and choose proper Application pool •Press OK to validate
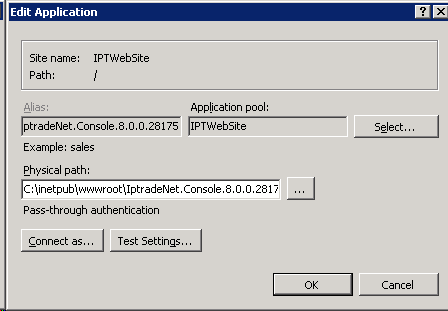
•Edit web.config and replace following elements : o@HOST@ : IP address of server where is installed application o@DBMS@ : Database management system (SQL Server | mySQL) o@DATABASE@ : Name of database where point the application (dbipt_10.1.Y.Z) o@USER@ : User used by database (iptuser) o@PASSWORD@ : Password used by database (azerqsdf) o@REDUNDANCY@ : Redundancy identity (1 to 6) o@VIRTUALAPPLIANCE@ : Virtual appliance is used (true | false). Normally it should be false. o@SERVICEDBMS@ : Name of Windows service used by DBMS (SQL Server | MySQL55 | MySQL56).
<configuration xmlns="http://schemas.microsoft.com/.NetConfiguration/v2.0">
<connectionStrings>
<add name="DatabaseConnection" connectionString="db://@HOST@/?driver=@DBMS@;db=@DATABASE@;user=@USER@;password=@PASSWORD@" />
</connectionStrings>
<appSettings>
<add key="EventThreshold" value="0" />
<add key="RedundancyIdentity" value="@REDUNDANCY@" />
<add key="VirtualAppliance" value="@VIRTUALAPPLIANCE@"/>
<add key="ServiceDBMS" value="@SERVICEDBMS@"/>
</appSettings>
...
|
Install TSS application
•Copy folder 'TSS' of package to folder where points site IPTWebSite (to get this information, open IIS, select site and click on Basic Settings... button. Information is given by Physical Path textbox. ie: D:\iptwebsite\) and rename it to 'IptradeNet.TSS.10.1.Y.Z' (version number depends of your installed version number)
•Open IIS •Right click on folder application and click on Convert to Application •Click on button Select... and choose proper Application pool •Press OK to validate
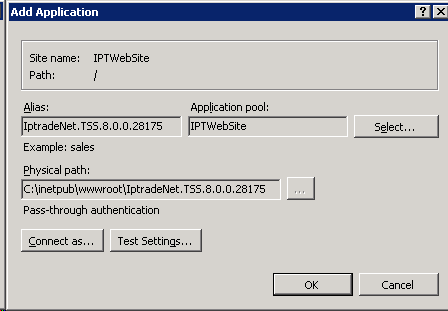
•Edit web.config and replace following elements : o@HOST@ : IP address of server where is installed application o@DBMS@ : Database management system (SQL Server | mySQL) o@DATABASE@ : Name of database where point the application (dbipt_10.1.Y.Z) o@USER@ : User used by database (iptuser) o@PASSWORD@ : Password used by database (azerqsdf) o@REDUNDANCY@ : Redundancy identity (1 to 6) o@VIRTUALAPPLIANCE@ : Virtual appliance is used (true | false). Normally it should be false. o@SERVICEDBMS@ : Name of Windows service used by DBMS (SQL Server | MySQL55 | MySQL56).
<configuration xmlns="http://schemas.microsoft.com/.NetConfiguration/v2.0">
<connectionStrings>
<add name="DatabaseConnection" connectionString="db://@HOST@/?driver=@DBMS@;db=@DATABASE@;user=@USER@;password=@PASSWORD@" />
</connectionStrings>
<appSettings>
<add key="EventThreshold" value="0" />
<add key="RedundancyIdentity" value="@REDUNDANCY@" />
<add key="VirtualAppliance" value="@VIRTUALAPPLIANCE@"/>
<add key="ServiceDBMS" value="@SERVICEDBMS@"/>
</appSettings>
...
|
Install IptradeNet application
•Copy folder 'IptradeNet' of package to folder where points site IPTWebSite (to get this information, open IIS, select site and click on Basic Settings... button. Information is given by Physical Path textbox. ie: D:\iptwebsite\). •Right click on folder application and click on Convert to Application •Click on button Select... and choose proper Application pool •Press OK to validate •Upgrade IptradeNet: oGo to folder where IptradeNet has been installed. oEdit file data.xml oEdit file to reference new installed version. Let consider you have installed 6.0 version: BEFORE:
<?xml version="1.0"?>
<installs active="">
</installs>
AFTER:
<installs active="8.2.1.33261">
<install version="8.2.1.33261" console_url="/iptradenet.console.8.2.1.33261" tss_url="/iptradenet.tss.8.2.1.33261" />
</installs>
o Save changes
Update TSS Settings
•Edit table content APP_GLOBALSETTING. •Change value of key tss.redundancy.total and set total number of instance
Example:
•version.redundancy.identity.x = a.a.a.aaaaa •versionselector.redundancy.identity.x = http://[IP_ADDRESS]/iptradenet •tss.redundancy.total = 2 Copy dll file
From TSS firmware, copy the StdConfigX.dll to c:\windows\system32\ (where X is replaced by major version). Give Network Service full permission right to this file.
 Warning Warning
On Windows Server x64, you have to set full rights for NETWORK SERVICE user on both files: C:\WINDOWS\SYSTEM32\StdConfigXa.dll and C:\WINDOWS\SYSTEM32\StdConfigXb.dll. (where X is replaced by major version).
|
Reset IIS
•Open command line. •End following command iisreset and press ENTER. Install Logging Service
This section describes how to install and configure the TSS Logging engine. It is dedicated to listening and storing the log messages coming either through Syslog or through Syslog over WebSocket. It comes in the form of a Windows service that can be controlled (started, stopped or restarted).
1.Copy content of folder 'Components\LoggingService' of package to whenever you want, hereafter called the "logging service's folder". For instance, paste copied files into C:\Program Files\IPTrade\LoggingService. 2.Create the logging service's configuration file named application.cfg in the logging service's folder and write the following default configuration (which can be adapted according to your needs): syslog.path=C:\Syslog
syslog.filesize=5
syslog.port=514
syslog.http.port=8000
syslog.https.port=
syslog.totalsize=1024
syslog.totalday=180
3.Create a Windows service for the Logging using the command (where the option start= auto can be omitted to prevent the logging service to automatically start each time the computer is restarted): sc.exe CREATE "IPTRADE Logging Service" binpath= "<logging service's folder path>\LoggingService.exe" start= auto
4.Start the newly created Logging Service. |


